Smarter POS, payments & workforce tools — built for every business

POS setup & everyday operations

POS Setup Guide

A confident team starts here.

Set up your station, understand each setting, and see how your choices affect orders, payments, and receipts.

  • 21Settings sections
  • 252Controls explained
  • 27Screen examples

Screenshots show the actual application UI in an isolated local session with demo values. Some conditional settings are enabled to expose their controls. Receipt images are rendered examples from the desktop templates, not photographs or proof of successful physical printing. Screenshots show the top of each section; scroll in the app for additional controls.

Your saved settings

Save frequently used settings with the Save button on any setting card. Your saved list stays in this browser when storage is available.

Explore the guide

Choose a topic. Each page includes the original explanations and relevant screenshots.

  1. 01 Set up a station Example IP addresses are placeholders. Use the addresses and ports configured on the customer’s own network. Open guide →
  2. 02 Save and restore settings Station scope. Many values are held in global memory while editing and saved to browser local storage on Save and Close. Backend settings APIs provide a separate saved configuration. Another browser profile, another device or a cleared browser storage area can have different values. Desktop printer settings are also included in settings JSON synchronization. Open guide →
  3. 03 App Theme Choose colours with enough contrast for the cashier. Individual button colours and the catalog dark-mode switch are separate controls. 21 settings · Open section →
  4. 04 Action Panel These switches expose actions or alter action prompts. They do not grant staff permissions; a visible action may still be unavailable to the signed-in employee. 29 settings · Open section →
  5. 05 UI Tag These fields rename visible labels. They do not change stored order types, printer routes or business calculations. 10 settings · Open section →
  6. 06 Catalog Configuration Controls catalog availability and presentation. Menu content, prices and timing data are supplied separately by the business catalog. 14 settings · Open section →
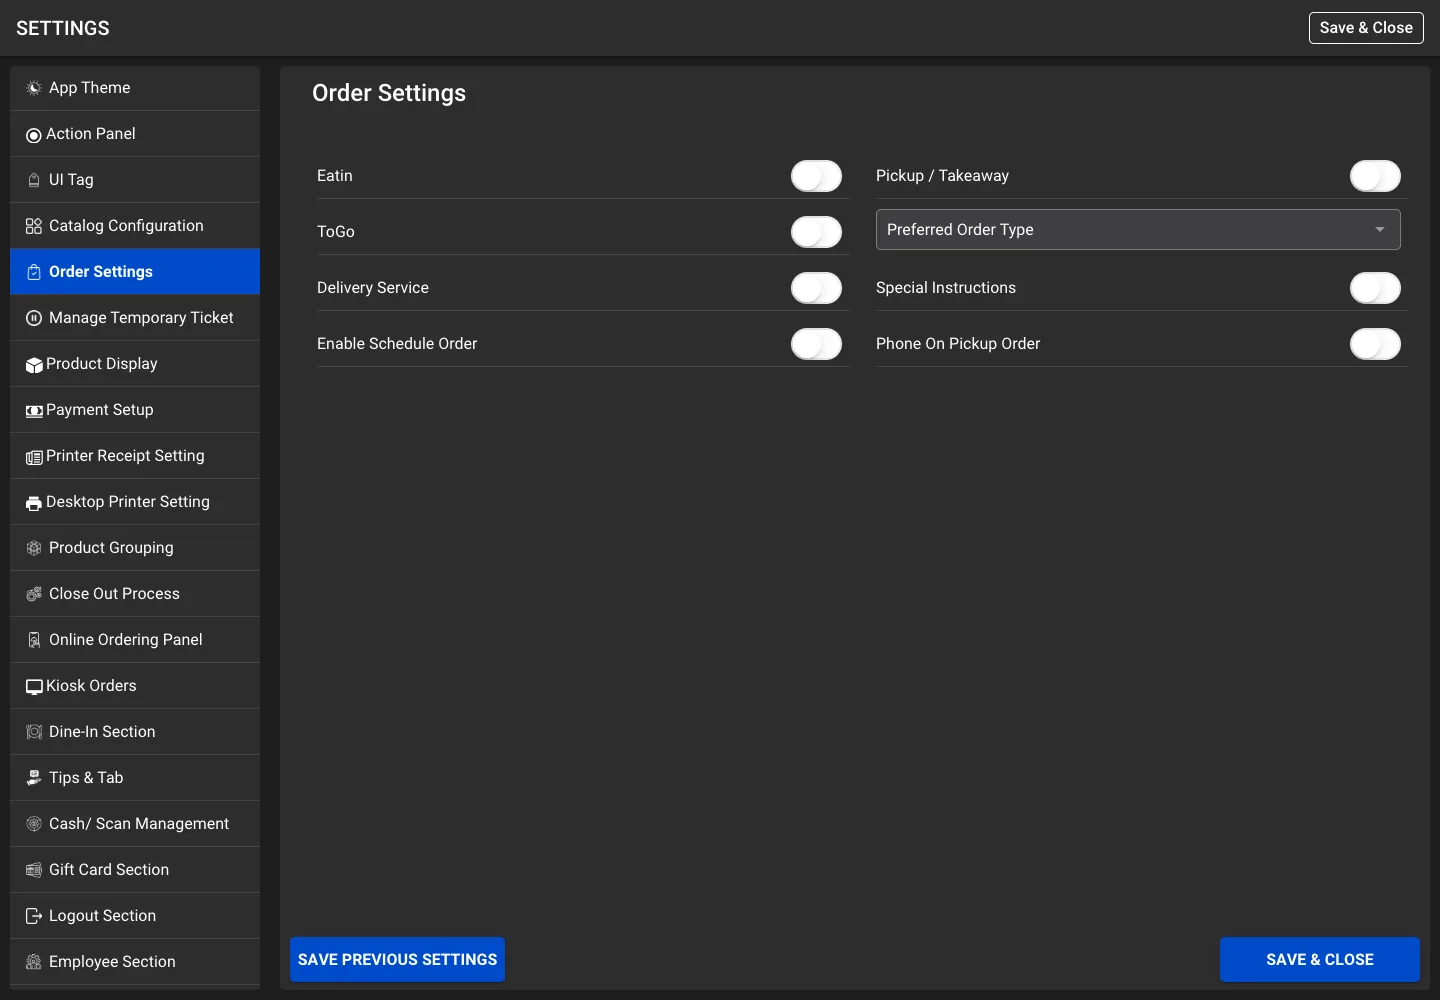
  7. 07 Order Settings Controls which order types and associated entry prompts are available. A reopened order can restore its previously saved order type. 8 settings · Open section →
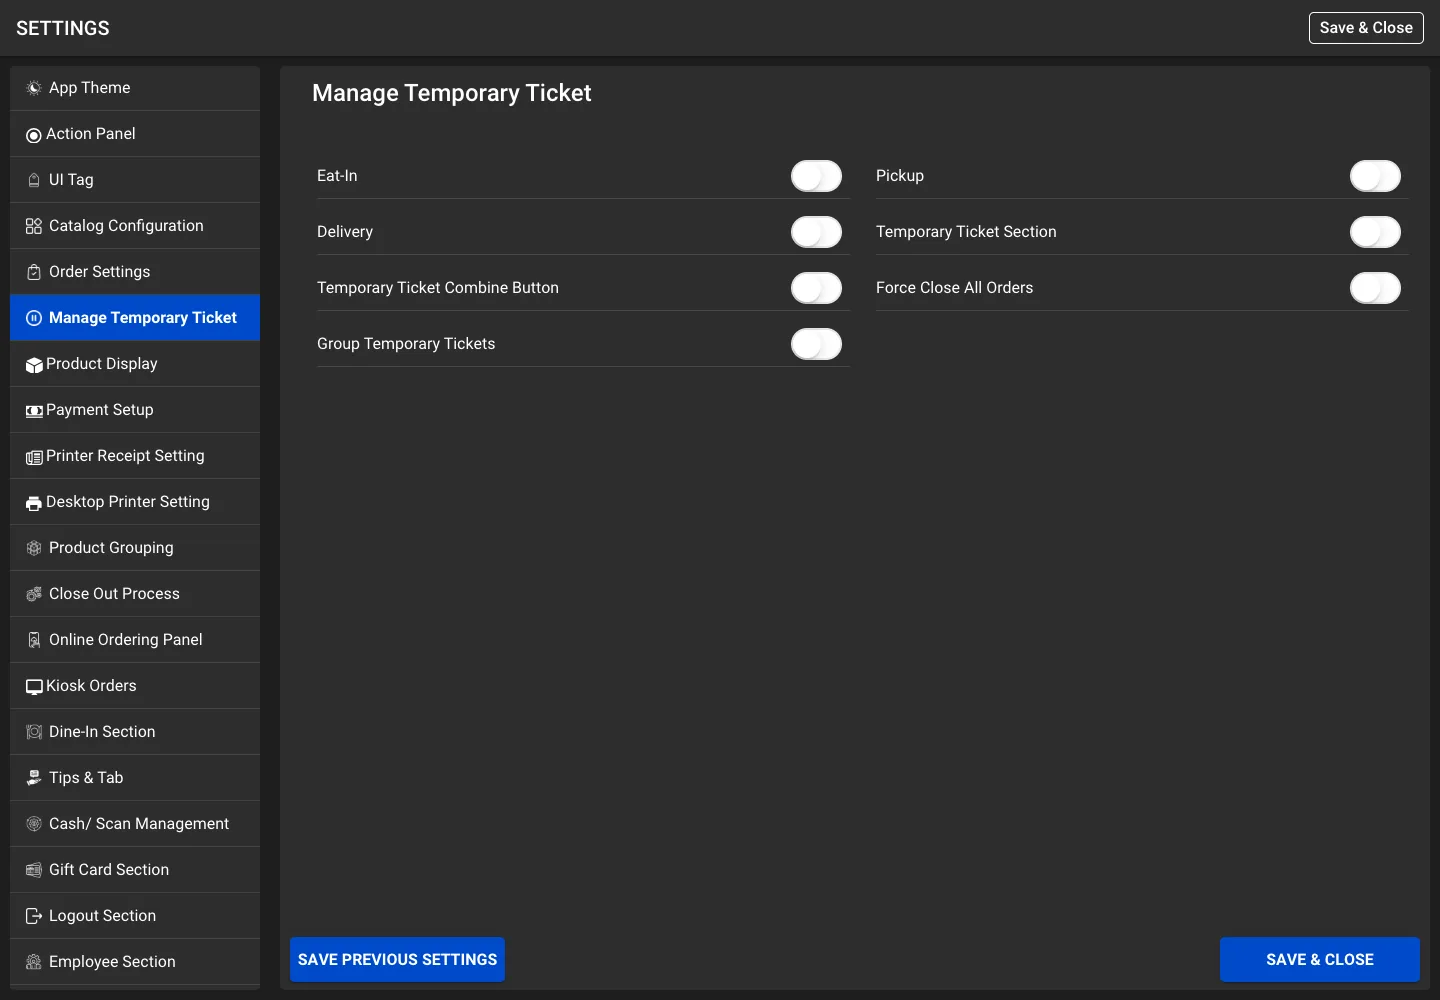
  8. 08 Manage Temporary Ticket Temporary tickets are held or open orders. These controls affect entry points, filters, grouping and completion behavior. 7 settings · Open section →
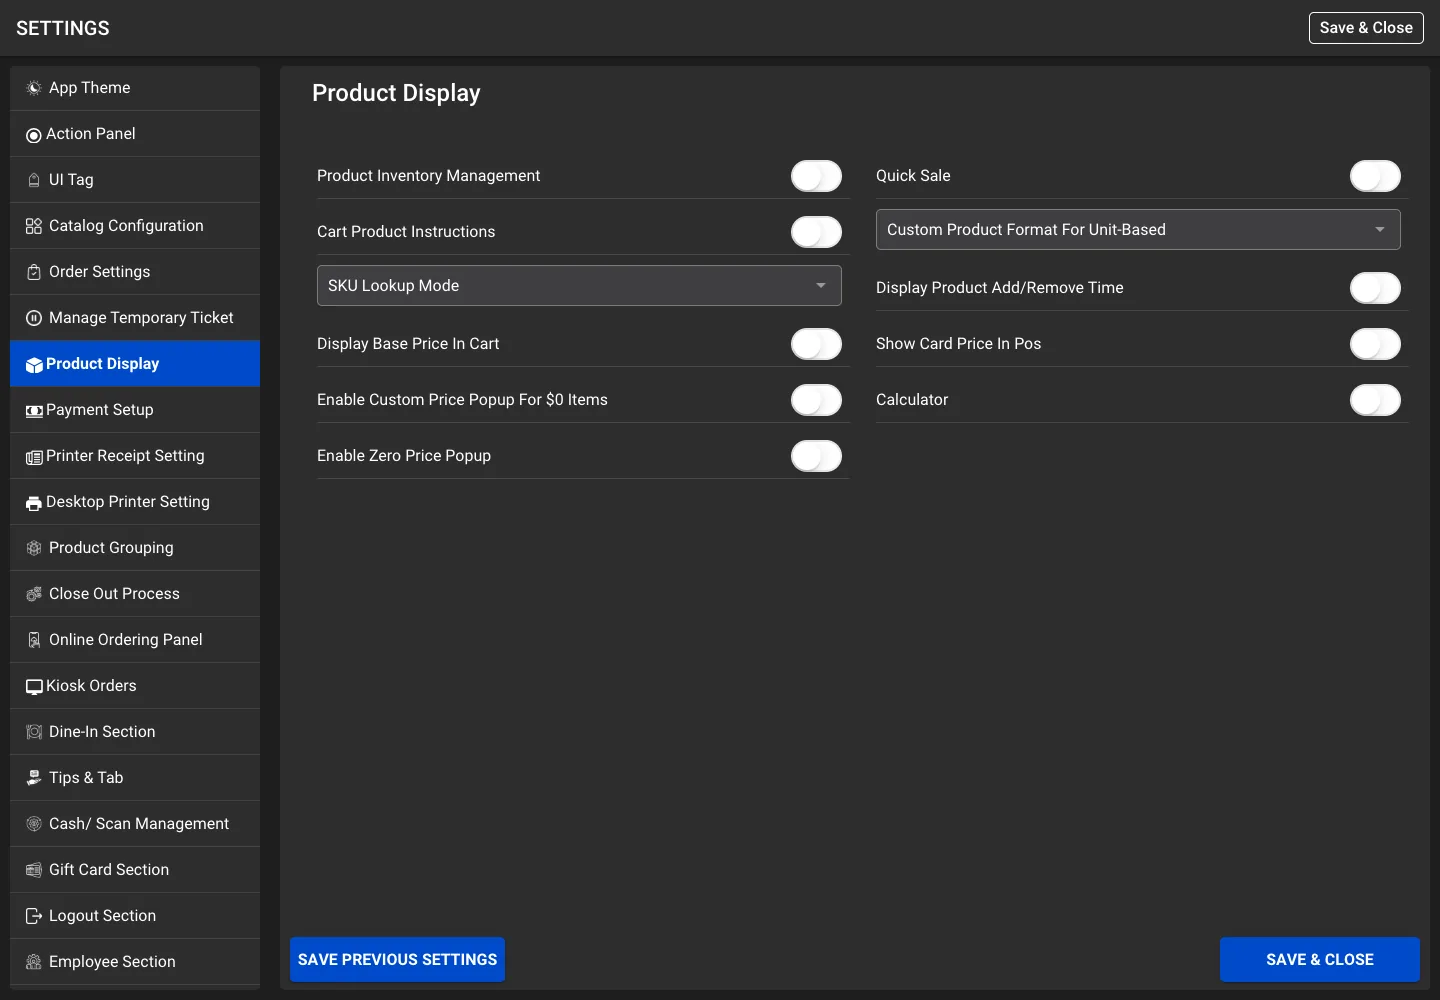
  9. 09 Product Display Controls product-entry, inventory UI, price display and SKU behavior. Display settings do not automatically change the underlying product price. 11 settings · Open section →
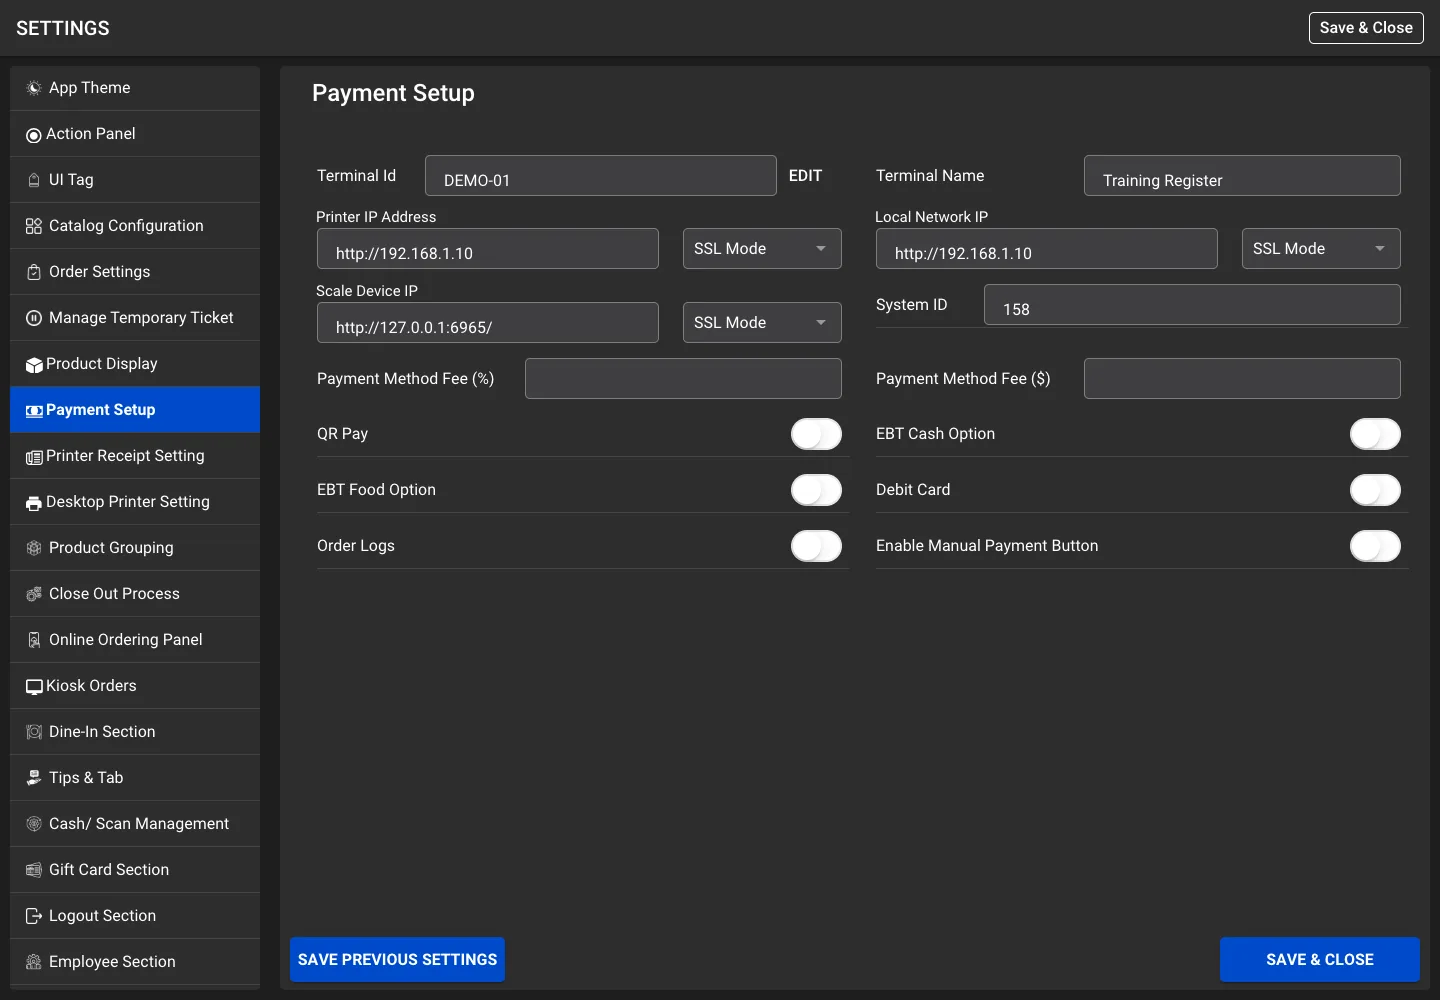
  10. 10 Payment Setup Configure this station and its local service addresses. Printer IP Address here means the local print-server host. The actual desktop receipt-printer address belongs in Desktop Printer Setting. 18 settings · Open section →
  11. 11 Printer Receipt Setting These settings control when to print and which workflow to use. Local-server templates decide rendering for server-routed jobs. Direct desktop check formatting has a separate settings section. 22 settings · Open section →
  12. 12 Desktop Printer Setting This tab appears only when runtime_platform is desktop, immediately after Printer Receipt Setting. Choose the cash-drawer route and the receipt-printer route separately when needed. Direct desktop checks use Template 3 only when online is the Boolean true; otherwise they use Template 1. 31 settings · Open section →
  13. 13 Product Grouping Controls item grouping and catalog shortcuts. Some legacy catalog shortcut switches are still saved but their buttons are commented out in the current catalog template. 5 settings · Open section →
  14. 14 Close Out Process Controls report data selection and printed detail visibility. The report API must return the requested data. Desktop card-detail printing also depends on the Desktop Printer Setting detail switches. 6 settings · Open section →
  15. 15 Online Ordering Panel Online-order retrieval, alerts and ringtone behavior are separate from automatic printing. Auto Print Online Orders and Online Order Print Type are in Printer Receipt Setting. 3 settings · Open section →
  16. 16 Kiosk Orders Kiosk kitchen printing uses businessAppsOrders.kiosk_order and accepts only status ACCEPTED. Ringing and popup behavior use validateClockIn.kiosk_orders, a count. Kiosk orders are excluded from the online-order list and legacy online popup. 4 settings · Open section →
  17. 17 Dine In Section This section is available only with table-access permission. Tables and rooms must already exist; these controls select how the POS uses them. 5 settings · Open section →
  18. 18 Tips and Tab Controls tip entry, customer-facing tip flows, guest-count rules and service fees. Tip presets are also reused on the service-charge keypad. Review amounts on a sample order before using new rules. 29 settings · Open section →
  19. 19 Cash and Scan Management Separates cash counting, physical drawer opening, cash-entry validation, scanning and cash-discount configuration. A cash-drawer-management toggle is not a printer connection setting. 15 settings · Open section →
  20. 20 Gift Card Section External Gift Card belongs to the Payment page. Physical and Virtual actions belong to the cart gift-card workflow. Those paths use different controls and should be tested separately. 4 settings · Open section →
  21. 21 Logout Section Controls when the employee session ends or switches. The business login and saved station configuration are separate from employee logout. 6 settings · Open section →
  22. 22 Employee Section Controls employee selection and attribution. Staff permissions are configured separately and still restrict actions. 3 settings · Open section →
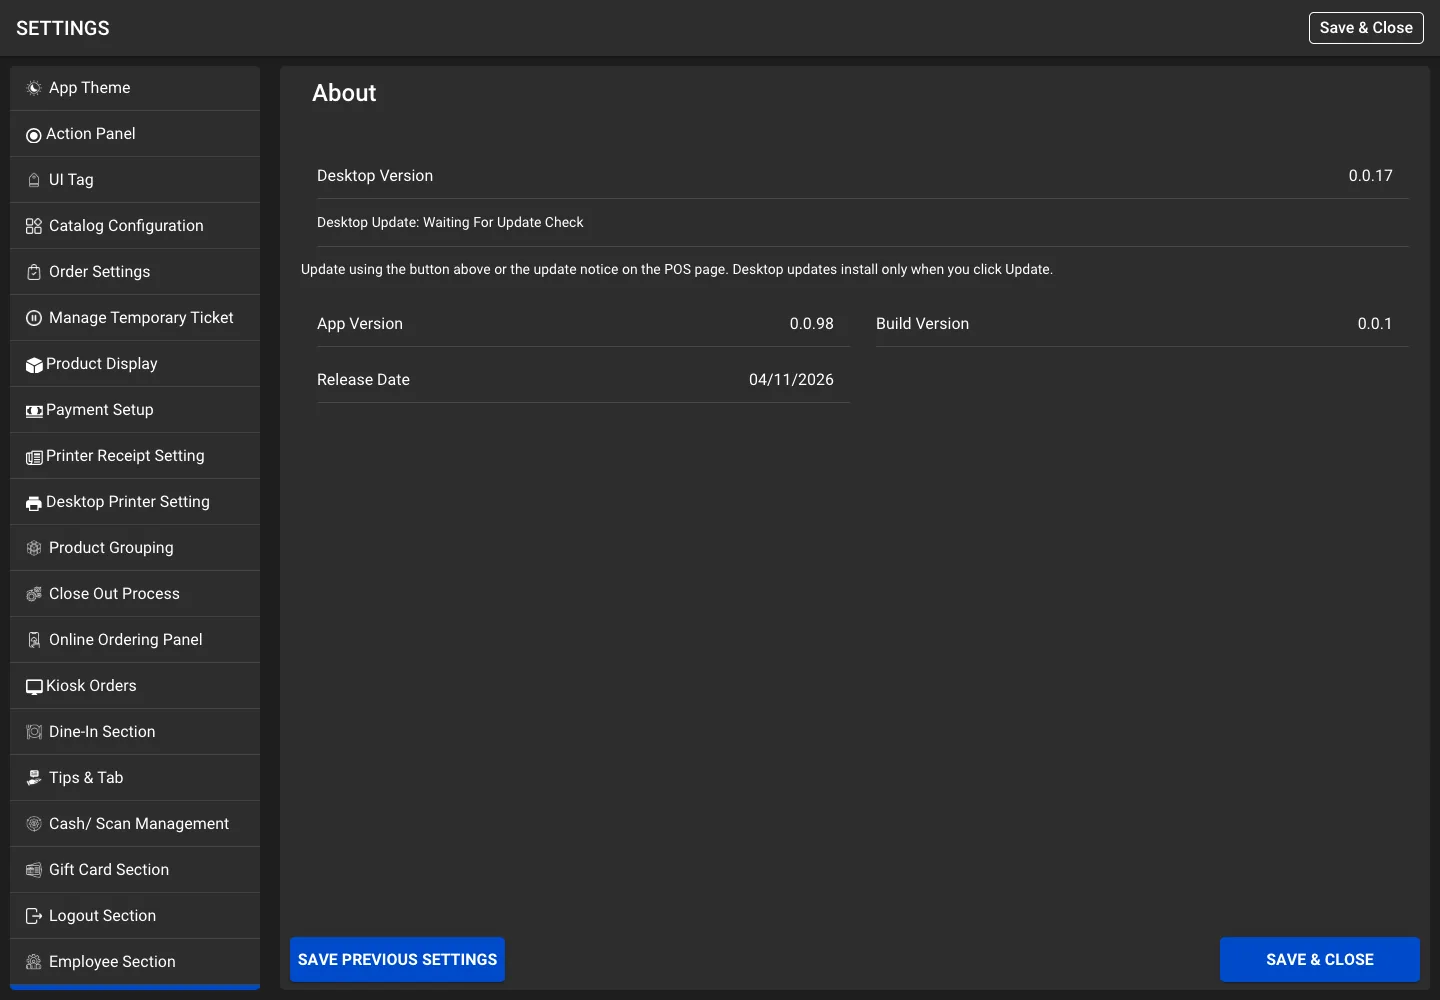
  23. 23 About Displays application and desktop version information. Desktop updating requires an available newer version and a functioning desktop update bridge. 1 settings · Open section →
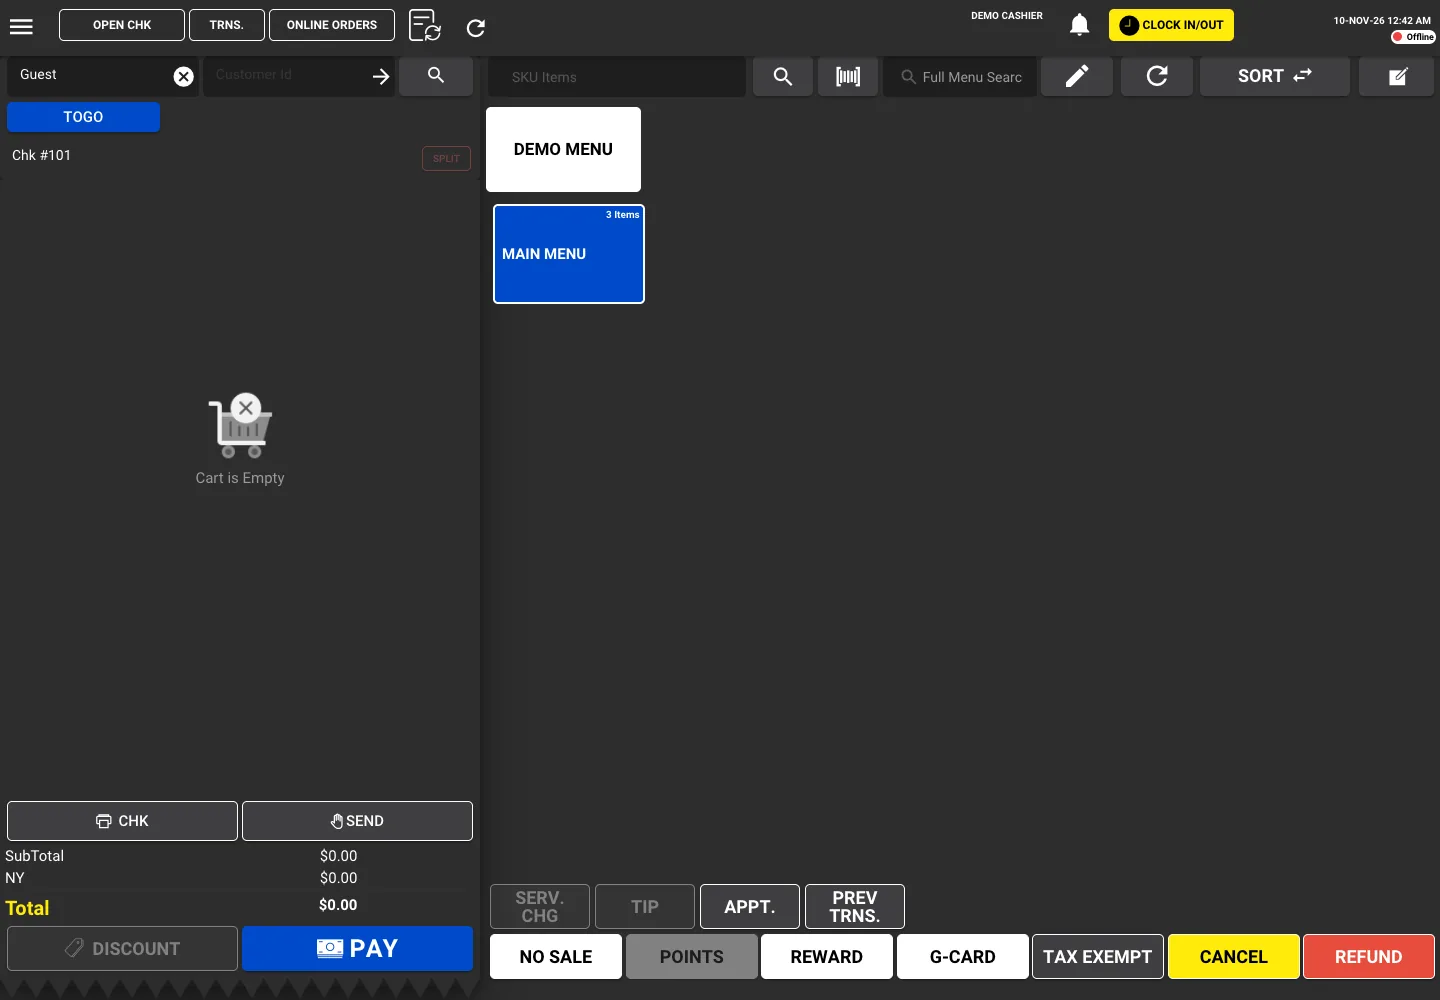
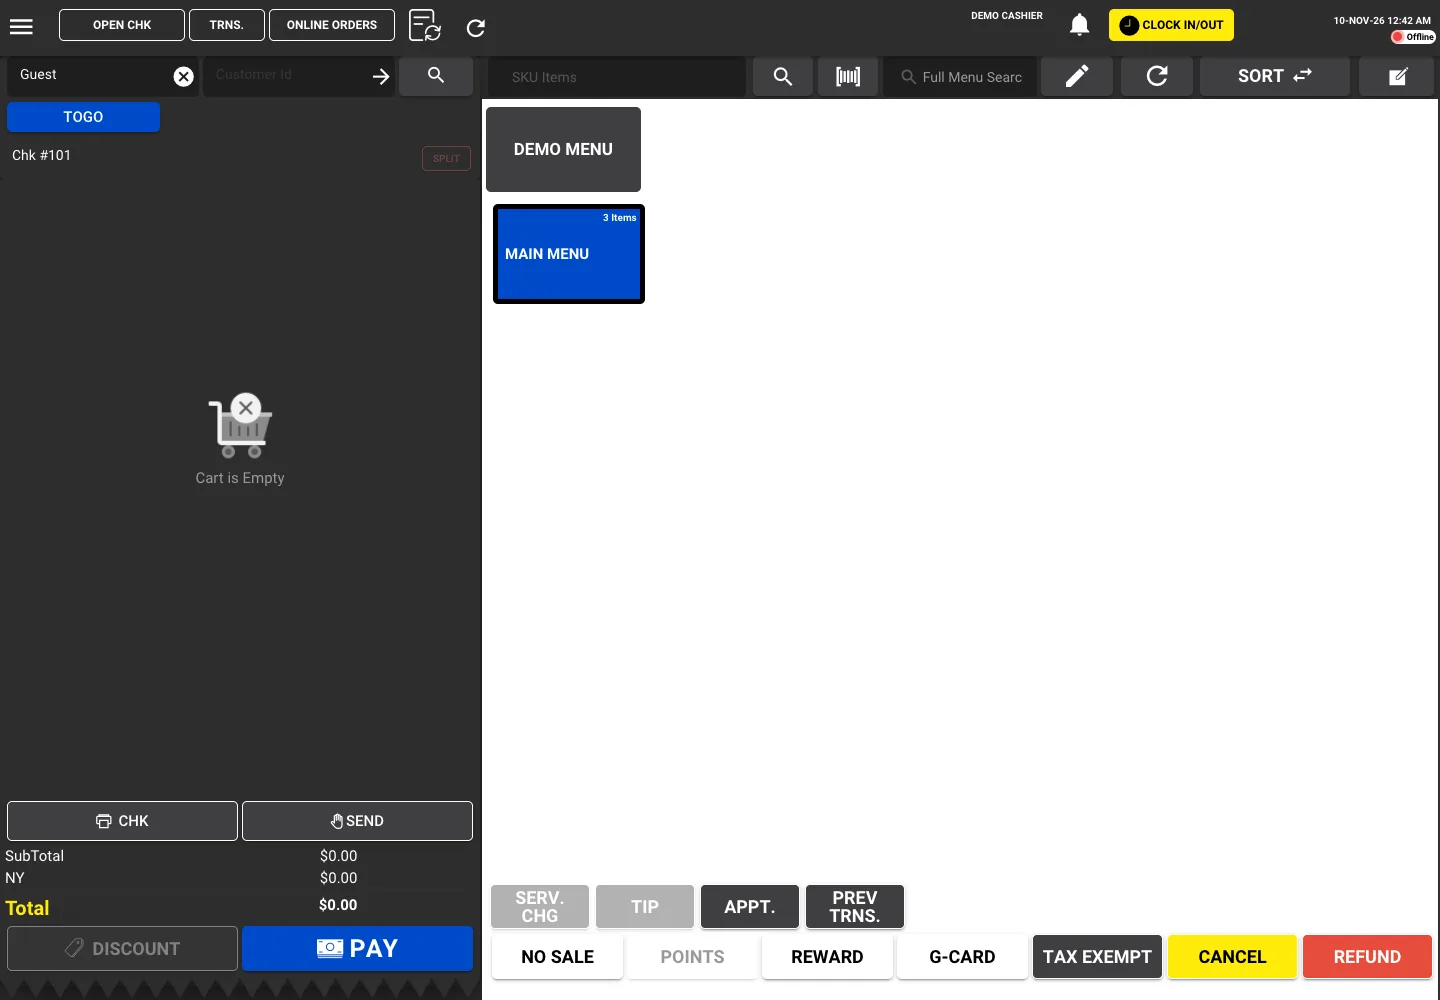
  24. 24 Screens showing the effects These examples show where settings take effect. Demo values are for orientation and are not a recommended business configuration. In the HTML guide, click an image to enlarge it. Open guide →
  25. 25 Important setting combinations Step-by-step guidance and practical examples for your team. Open guide →
  26. 26 Inactive and hidden controls The following differences matter when training staff. A stored preference is not proof that an active workflow reads it. Open guide →
  27. 27 Setup acceptance checks Step-by-step guidance and practical examples for your team. Open guide →
  28. 28 Source reference This reference maps the guide to the current project. Setting descriptions use active consumers where available; externally implemented printer and customer-app behavior is identified as dependent on that service. Open guide →

Merchant guide / 01

Set up a station

Step-by-step merchant reference

Connection examples

EquipmentConfigureExpected route
Drawer connected to LAN printerDesktop connection Network; Cash Drawer Printer IP 192.168.1.100; Printing IP blankDrawer pulse and receipts use that printer.
USB trigger plus LAN printerDesktop connection Serial; actual COM port such as COM3; Printing IP 192.168.1.101Drawer uses COM; receipts use the network printer.
USB trigger plus USB printerSerial; actual COM port; Printing IP blank; select Windows Receipt PrinterDrawer uses COM; receipts use the Windows driver.
Browser or mobile local printingPayment Setup printer-server host and SSL portPrint API receives the payload; local server routes physical printers.

Example IP addresses are placeholders. Use the addresses and ports configured on the customer’s own network.

Merchant guide / 02

Save and restore settings

Step-by-step merchant reference

ControlPurposeEffect
Save and CloseValidates desktop printer settings and the local printer and offline host addresses, writes station settings to local storage, builds the settings JSON, and calls the staff and general settings-save APIs.Applies colour variables, updates tip presets and closes Settings. API errors are not surfaced by these save subscriptions, so closing is not proof that the cloud save succeeded.
Save Previous SettingsShows a Sync Settings confirmation. Sync Now calls getPosSetting and loads returned settings into the current screen.This restores saved settings; it does not upload the current changes. Review the loaded values and use Save and Close to persist them locally.
Save and Test buttonsSave the desktop printer settings, then run the named hardware test.These tests can print paper or open the drawer. They are not previews.

Station scope. Many values are held in global memory while editing and saved to browser local storage on Save and Close. Backend settings APIs provide a separate saved configuration. Another browser profile, another device or a cleared browser storage area can have different values. Desktop printer settings are also included in settings JSON synchronization.

Conditional visibility. Desktop Printer Setting requires the desktop runtime. Dine In Section requires table-access permission. Terminal Id requires an enabled payment integration. COM Port, Windows Receipt Printer, ID Capture Limit and Inactivity Timeout appear only when their controlling settings are active.

Permission scope. A settings toggle that shows a button does not override manager approval, staff permission, offline restrictions or an order’s eligibility.

Merchant guide / 03

App Theme

21 settings explained · Reference guide — change settings inside your POS.

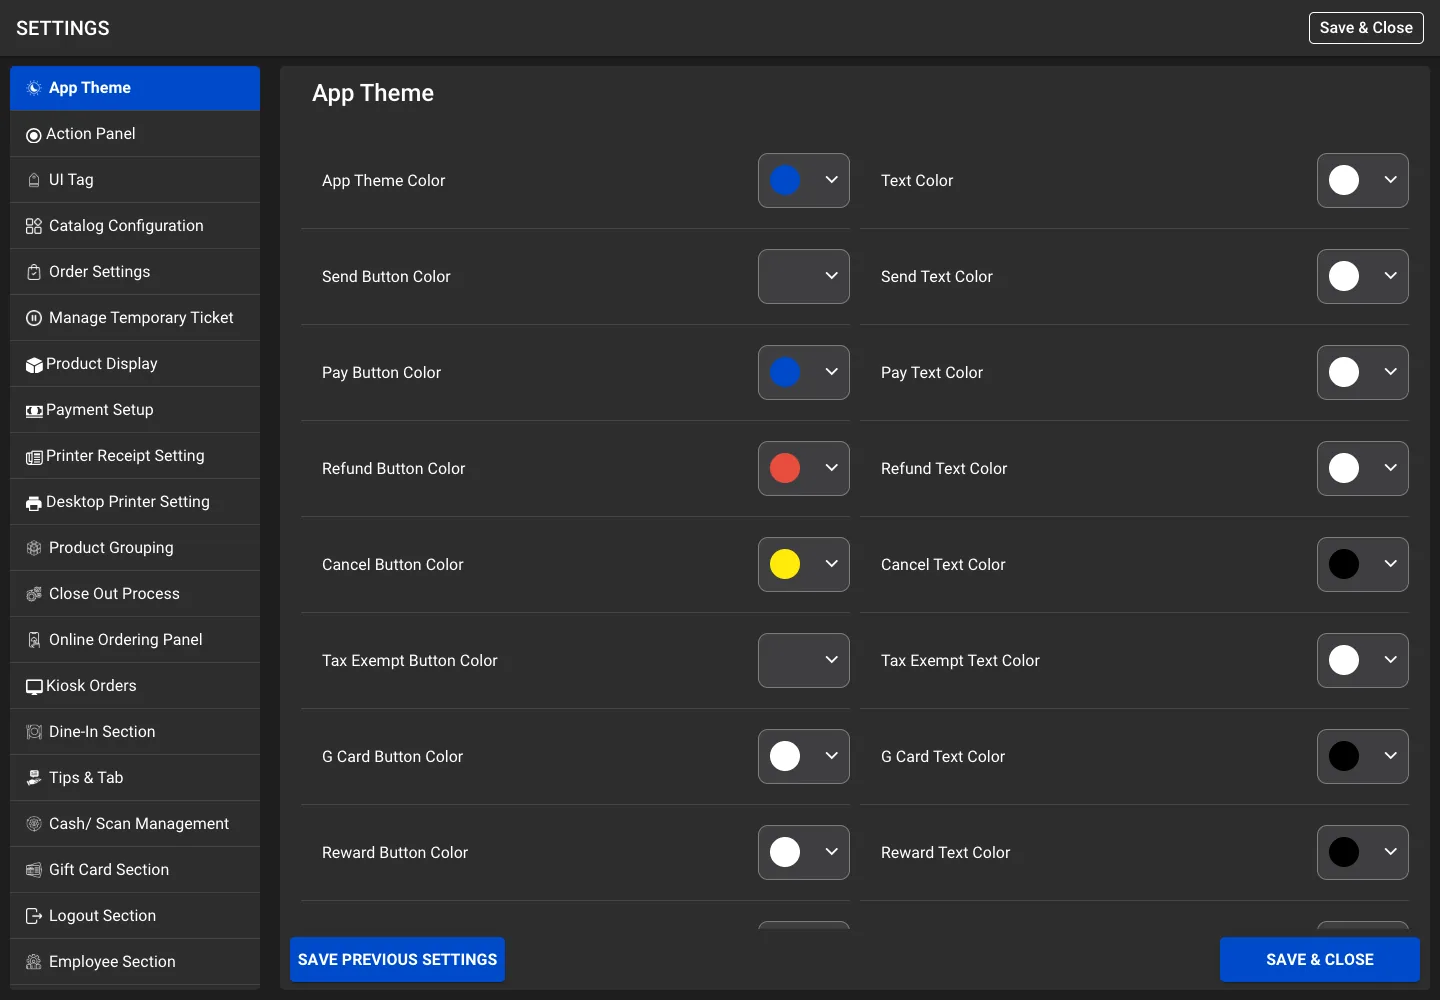
Choose colours with enough contrast for the cashier. Individual button colours and the catalog dark-mode switch are separate controls.

Screen 01 · App Theme
App Theme settings screen with demo values
App Theme in the Settings screen with demo values. Additional controls may be below the visible scroll area.

See the affected screen or receipt example.

Colour picker

App Theme Color

Choose the app theme color using the colour picker. Applies the primary theme colour used by the app. Save and Close applies the theme variables. This changes appearance only.

Where you’ll see it

App theme

Link to this setting ↗

Colour picker

Text Color

Choose the text color using the colour picker. Applies the secondary text colour used by the theme. Save and Close applies the theme variables. This changes appearance only.

Where you’ll see it

App theme

Link to this setting ↗

Colour picker

Send Button Color

Choose the send button color using the colour picker. Changes the corresponding action background or text where that colour is bound. Save and Close applies the theme variables. This changes appearance only.

Where you’ll see it

POS action buttons

Link to this setting ↗

Colour picker

Send Text Color

Choose the send text color using the colour picker. Changes the corresponding action background or text where that colour is bound. Save and Close applies the theme variables. This changes appearance only.

Where you’ll see it

POS action buttons

Link to this setting ↗

Colour picker

Pay Button Color

Choose the pay button color using the colour picker. Changes the corresponding action background or text where that colour is bound. Save and Close applies the theme variables. This changes appearance only.

Where you’ll see it

POS action buttons

Link to this setting ↗

Colour picker

Pay Text Color

Choose the pay text color using the colour picker. Changes the corresponding action background or text where that colour is bound. Save and Close applies the theme variables. This changes appearance only.

Where you’ll see it

POS action buttons

Link to this setting ↗

Colour picker

Refund Button Color

Choose the refund button color using the colour picker. Changes the corresponding action background or text where that colour is bound. Save and Close applies the theme variables. This changes appearance only.

Where you’ll see it

POS action buttons

Link to this setting ↗

Colour picker

Refund Text Color

Choose the refund text color using the colour picker. Changes the corresponding action background or text where that colour is bound. Save and Close applies the theme variables. This changes appearance only.

Where you’ll see it

POS action buttons

Link to this setting ↗

Colour picker

Cancel Button Color

Choose the cancel button color using the colour picker. Changes the corresponding action background or text where that colour is bound. Save and Close applies the theme variables. This changes appearance only.

Where you’ll see it

POS action buttons

Link to this setting ↗

Colour picker

Cancel Text Color

Choose the cancel text color using the colour picker. Changes the corresponding action background or text where that colour is bound. Save and Close applies the theme variables. This changes appearance only.

Where you’ll see it

POS action buttons

Link to this setting ↗

Colour picker

Tax Exempt Button Color

Choose the tax exempt button color using the colour picker. Changes the corresponding action background or text where that colour is bound. Save and Close applies the theme variables. This changes appearance only.

Where you’ll see it

POS action buttons

Link to this setting ↗

Colour picker

Tax Exempt Text Color

Stores Tax Exempt Text Color as taxExamptTextColor. The cart template reads taxExemptTextColor instead, so this field may not affect the Tax Exempt button text in this version.

Where you’ll see it

Tax Exempt text colour mismatch

Link to this setting ↗

Colour picker

G Card Button Color

Choose the g card button color using the colour picker. Changes the corresponding action background or text where that colour is bound. Save and Close applies the theme variables. This changes appearance only.

Where you’ll see it

POS action buttons

Link to this setting ↗

Colour picker

G Card Text Color

Choose the g card text color using the colour picker. Changes the corresponding action background or text where that colour is bound. Save and Close applies the theme variables. This changes appearance only.

Where you’ll see it

POS action buttons

Link to this setting ↗

Colour picker

Reward Button Color

Choose the reward button color using the colour picker. Changes the corresponding action background or text where that colour is bound. Save and Close applies the theme variables. This changes appearance only.

Where you’ll see it

POS action buttons

Link to this setting ↗

Colour picker

Reward Text Color

Choose the reward text color using the colour picker. Changes the corresponding action background or text where that colour is bound. Save and Close applies the theme variables. This changes appearance only.

Where you’ll see it

POS action buttons

Link to this setting ↗

Colour picker

Points Button Color

Choose the points button color using the colour picker. Changes the corresponding action background or text where that colour is bound. Save and Close applies the theme variables. This changes appearance only.

Where you’ll see it

POS action buttons

Link to this setting ↗

Colour picker

Points Text Color

Choose the points text color using the colour picker. Changes the corresponding action background or text where that colour is bound. Save and Close applies the theme variables. This changes appearance only.

Where you’ll see it

POS action buttons

Link to this setting ↗

Colour picker

No Sale Button Color

Choose the no sale button color using the colour picker. Changes the corresponding action background or text where that colour is bound. Save and Close applies the theme variables. This changes appearance only.

Where you’ll see it

POS action buttons

Link to this setting ↗

Colour picker

No Sale Text Color

Choose the no sale text color using the colour picker. Changes the corresponding action background or text where that colour is bound. Save and Close applies the theme variables. This changes appearance only.

Where you’ll see it

POS action buttons

Link to this setting ↗

Toggle

Dark Mode

On uses the dark catalog theme; off uses the light variant. Appearance changes do not change orders or prices.

Where you’ll see it

POS catalog appearance

Link to this setting ↗

Merchant guide / 04

Action Panel

29 settings explained · Reference guide — change settings inside your POS.

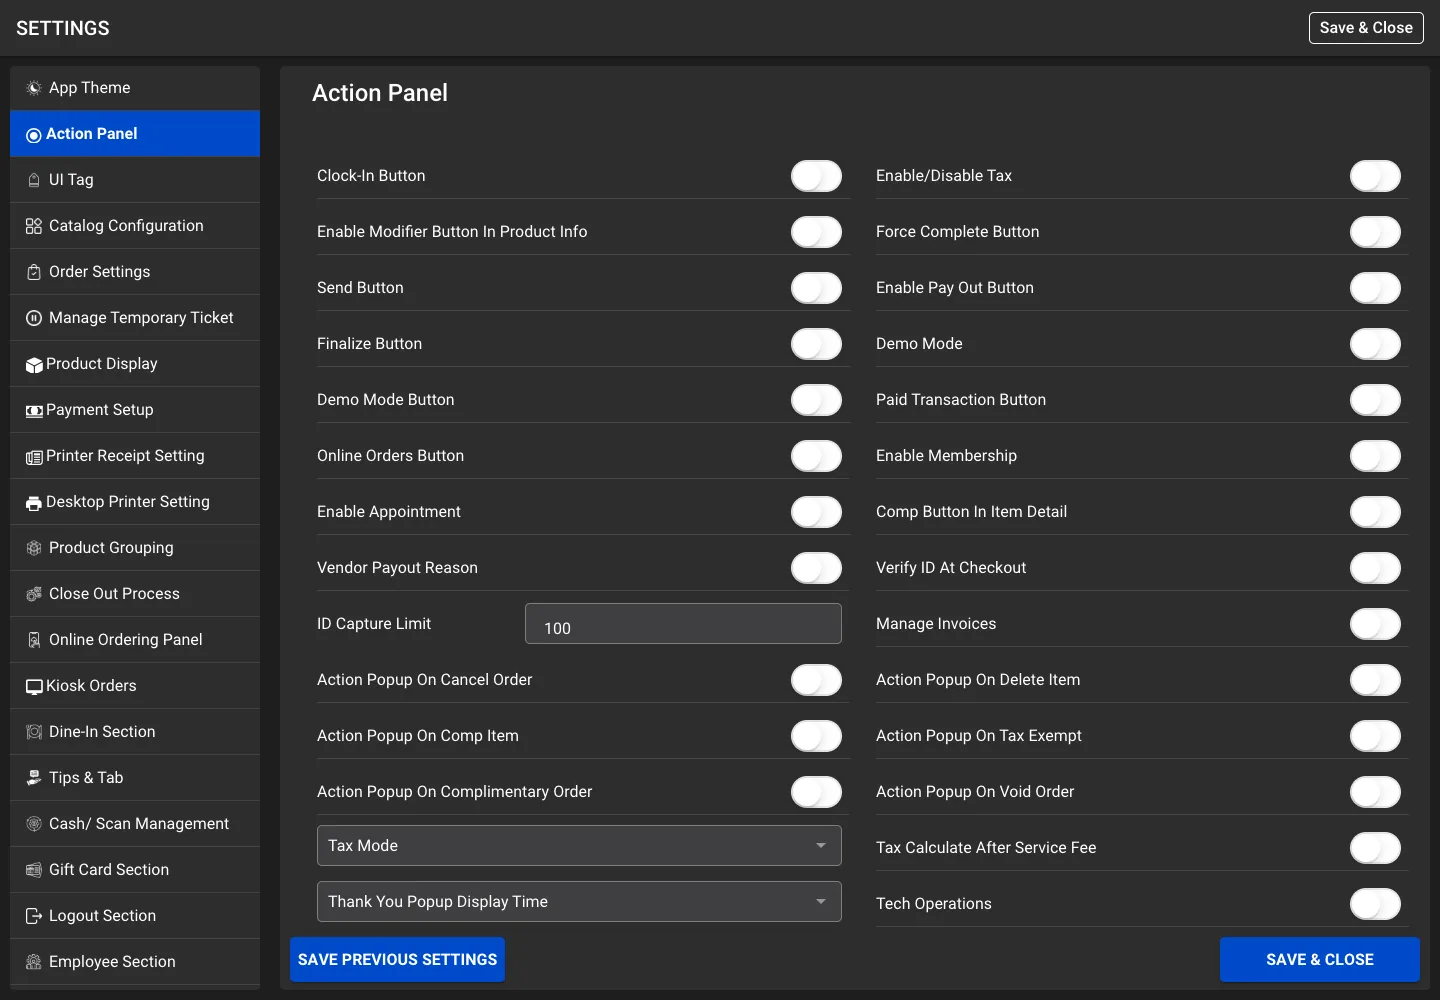
These switches expose actions or alter action prompts. They do not grant staff permissions; a visible action may still be unavailable to the signed-in employee.

Screen 02 · Action Panel
Action Panel settings screen with demo values
Action Panel in the Settings screen with demo values. Additional controls may be below the visible scroll area.

See the affected screen or receipt example.

Toggle

Clock-In Button

On shows the clock-in control in the POS navigation bar. Off hides that entry point; staff attendance records remain.

Where you’ll see it

POS toolbar

Link to this setting ↗

Toggle

Enable/Disable Tax

On shows the Tax Exempt action in the cart controls. Off hides that action. Despite the label, this is not the global switch that turns every item tax to zero.

Where you’ll see it

Cart Tax Exempt button

Link to this setting ↗

Toggle

Enable Modifier Button in Product Info

On exposes the modifier button in product details. Off hides that shortcut; product modifier rules still depend on the menu configuration.

Where you’ll see it

Product details

Link to this setting ↗

Toggle

Force Complete Button

Allows the Force Finalize button on Payment when the order is eligible for force completion. Refunds and other eligibility checks still apply; turning it on does not force-complete an order.

Where you’ll see it

Payment page

Link to this setting ↗

Toggle

Send Button

On shows the Send or hold-order button in the cart. Off hides it. The internal variable ends in disable, but true is used to show this button.

Where you’ll see it

Cart actions

Link to this setting ↗

Toggle

Enable Pay Out button

On enables the Pay Out entry point. Off removes or disables that feature in the corresponding POS controls. Payout permission still applies.

Where you’ll see it

Payout workflow

Link to this setting ↗

Toggle

Finalize Button

On enables the normal Pay or Finalize button when the staff member has permission. Off disables that button. Other busy-state and permission guards can still disable it.

Where you’ll see it

Cart Pay button

Link to this setting ↗

Toggle

Demo Mode

Marks the station for demo or test transactions where the order flow supports that flag. Do not assume this disables all payment-terminal or hardware activity.

Where you’ll see it

Order creation and demo mode

Link to this setting ↗

Toggle

Demo Mode Button

On shows the register control for demo mode. Off hides that control; the underlying Demo Mode setting is separate.

Where you’ll see it

POS demo-mode control

Link to this setting ↗

Toggle

Online Orders Button

On shows the Online Orders button. Off hides the shortcut. Enable Online Orders and automatic printing are separate settings.

Where you’ll see it

POS toolbar

Link to this setting ↗

Toggle

Enable Membership

On exposes membership actions and associated eligible payment-link controls. Off hides those entries. Business configuration and payment provider support still apply.

Where you’ll see it

Cart membership and payment

Link to this setting ↗

Toggle

Enable Appointment

On shows appointment entry points and appointment history. Off hides those controls. Table or order state can still prevent opening appointments.

Where you’ll see it

POS appointments and customer profile

Link to this setting ↗

Toggle

Comp Button in Item Detail

On exposes the item-level Comp control in product details. Off hides it. Approval and permissions can still be required.

Where you’ll see it

Product details

Link to this setting ↗

Toggle

Vendor Payout Reason

On requests a vendor payout reason in the applicable payout or tip-payout flow. Off skips that setting-controlled reason request.

Where you’ll see it

Payout reason prompt

Link to this setting ↗

Toggle

Verify ID at Checkout

On requests ID capture in eligible non-cash checkout flows when the total exceeds ID Capture Limit. It is not an unconditional request for every order.

Where you’ll see it

Payment and authorization

Link to this setting ↗

Input

ID Capture Limit

Enter the order-value threshold for ID capture. The code compares total greater than this value. Appears when Verify ID at Checkout is on.

Where you’ll see it

Payment ID capture threshold

Link to this setting ↗

Toggle

Manage Invoices

On opens the Select Print Type or Thank You modal after a successful payment. Off uses the direct completion and regular-print path, with drawer behavior depending on the tender. It does not manage invoice numbers.

Where you’ll see it

Post-payment receipt selection

Link to this setting ↗

Toggle

Action Popup on Cancel Order

On requests the configured action or reason popup when cancelling an order. Off skips that setting-controlled popup; other approval checks still apply.

Where you’ll see it

Cancel-order action

Link to this setting ↗

Toggle

Action Popup on Delete Item

On requests the action or reason popup when deleting an item. Off skips that popup; it does not restore removed items.

Where you’ll see it

Cart delete-item action

Link to this setting ↗

Toggle

Action Popup on Comp Item

On requests the action or reason popup for a complimentary item. Off skips that popup; item comp permission still applies.

Where you’ll see it

Item Comp action

Link to this setting ↗

Toggle

Action Popup on Tax Exempt

On requests the action or reason popup for tax exemption. Off skips that popup. The Tax Exempt button must also be accessible.

Where you’ll see it

Tax Exempt action

Link to this setting ↗

Toggle

Action Popup on Complimentary Order

On requests the action or reason popup for a complimentary order. Off skips that popup, without granting permission to comp orders.

Where you’ll see it

Order Comp action

Link to this setting ↗

Toggle

Action Popup on Void Order

On requests the action or reason popup for voiding an order. Off skips that popup; void permissions and order eligibility remain.

Where you’ll see it

Void-order action

Link to this setting ↗

Dropdown

Tax Mode

Choose tax on subtotal before discount or after discount. The stored values are manufacturer and in_store. This changes the discount-versus-tax calculation order, not item tax eligibility.

Where you’ll see it

Cart discount and tax calculation

Link to this setting ↗

Toggle

Tax Calculate After Service Fee

On adds tax on a positive service charge in the eat-in calculation path. Off skips that extra tax calculation. The current condition is specifically eat-in.

Where you’ll see it

Cart service-charge tax

Link to this setting ↗

Dropdown

Thank You Popup Display Time

Select how long the Thank You popup stays visible. Values 5 to 60 are seconds; 2, 5 and 10 minutes correspond to 120, 300 and 600 seconds.

Where you’ll see it

Post-payment Thank You popup

Link to this setting ↗

Toggle

Tech Operations

Opens a protected developer-mode verification flow when enabled. This is a technical-support setting, not a cashier sales option. The verification result determines whether it remains enabled.

Where you’ll see it

Developer and support controls

Link to this setting ↗

Toggle

Customer Screen

On enables the customer-facing screen polling and interaction paths. Off stops those setting-controlled customer-screen flows. It does not by itself configure a second display or disable every customer field.

Where you’ll see it

Customer display and customer-app interaction

Link to this setting ↗

Merchant guide / 05

UI Tag

10 settings explained · Reference guide — change settings inside your POS.

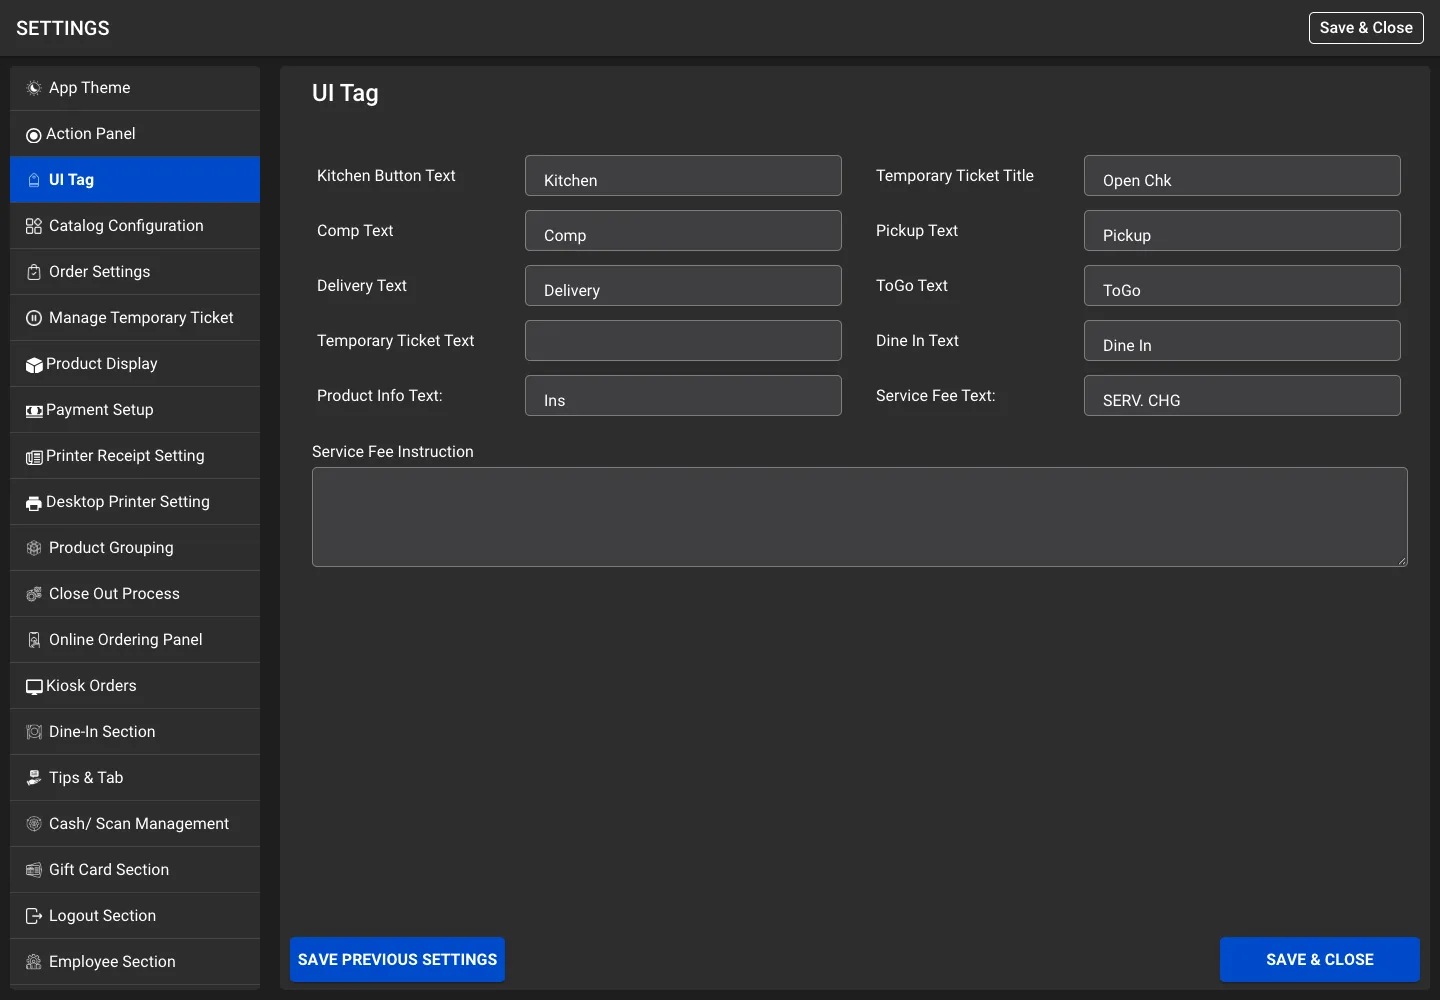
These fields rename visible labels. They do not change stored order types, printer routes or business calculations.

Screen 03 · UI Tag
UI Tag settings screen with demo values
UI Tag in the Settings screen with demo values. Additional controls may be below the visible scroll area.

See the affected screen or receipt example.

Input

Kitchen Button Text

Changes the displayed Kitchen button caption. It does not change which printer receives the job.

Where you’ll see it

POS kitchen action label

Link to this setting ↗

Input

Temporary ticket Title

Changes the title used for the temporary-ticket or held-order section.

Where you’ll see it

Held-order section title

Link to this setting ↗

Input

Comp Text

Changes the complimentary-action caption. It does not change permissions or the comp amount.

Where you’ll see it

Comp action label

Link to this setting ↗

Input

Pickup Text

Changes the Pickup label shown in order-type and related controls. The stored order type remains pickup.

Where you’ll see it

Order-type labels

Link to this setting ↗

Input

Delivery Text

Changes the Delivery display label. The underlying delivery workflow remains unchanged.

Where you’ll see it

Order-type labels

Link to this setting ↗

Input

ToGo Text

Changes the ToGo display label. The underlying order-type value remains unchanged.

Where you’ll see it

Order-type labels

Link to this setting ↗

Input

Temporary ticket text

Changes the Send or hold-ticket action text wherever HoldOrderButtonLabel is used.

Where you’ll see it

Cart temporary-ticket action

Link to this setting ↗

Input

Dine In Text

Changes the Dine In or table display label. It does not create tables or rooms.

Where you’ll see it

Dine-in labels

Link to this setting ↗

Input

Product Info Text:

Changes the product-instructions or product-information action caption.

Where you’ll see it

Product information controls

Link to this setting ↗

Input

Service Fee Text:

Changes the visible service-fee caption. It does not change the fee amount or calculation.

Where you’ll see it

Cart service-fee label

Link to this setting ↗

Merchant guide / 07

Order Settings

8 settings explained · Reference guide — change settings inside your POS.

Controls which order types and associated entry prompts are available. A reopened order can restore its previously saved order type.

Screen 05 · Order Settings
Order Settings settings screen with demo values
Order Settings in the Settings screen with demo values. Additional controls may be below the visible scroll area.

See the affected screen or receipt example.

Toggle

Eatin

On makes Eat In an available order-type choice. Off hides that choice. Dine-in management and table permissions are separate.

Where you’ll see it

Order-type selection

Link to this setting ↗

Toggle

Pickup / Takeaway

On makes Pickup or Takeaway available. Off hides that order-type choice.

Where you’ll see it

Order-type selection

Link to this setting ↗

Toggle

ToGo

On makes ToGo available. Off hides that order-type choice.

Where you’ll see it

Order-type selection

Link to this setting ↗

Dropdown

Preferred Order Type

Choose the preferred initial order type from ToGo, Pickup or Dine In. Enable the corresponding order-type option as well; a restored order can bring its own type.

Where you’ll see it

New-order default

Link to this setting ↗

Toggle

Delivery Service

On enables delivery or phone-order entry points. Off hides those setting-controlled entries. It does not configure a delivery fee.

Where you’ll see it

Delivery order workflow

Link to this setting ↗

Toggle

Special Instructions

On permits the order-level special-instructions UI. Off hides the setting-controlled entry point. Item instructions have their own controls.

Where you’ll see it

Cart order notes

Link to this setting ↗

Toggle

Enable Schedule Order

On enables scheduled-order controls. Off hides the schedule entry point. Existing scheduled orders retain their saved data.

Where you’ll see it

Scheduled orders

Link to this setting ↗

Toggle

Phone on Pickup Order

On requests a phone number in the pickup-order flow. Off skips that setting-controlled pickup phone prompt.

Where you’ll see it

Pickup customer details

Link to this setting ↗

Merchant guide / 08

Manage Temporary Ticket

7 settings explained · Reference guide — change settings inside your POS.

Temporary tickets are held or open orders. These controls affect entry points, filters, grouping and completion behavior.

Screen 06 · Manage Temporary Ticket
Manage Temporary Ticket settings screen with demo values
Manage Temporary Ticket in the Settings screen with demo values. Additional controls may be below the visible scroll area.

Toggle

Eat-In

On shows the Eat-In filter in held orders when compatible with the dine-in grouping mode. Off hides that filter.

Where you’ll see it

Temporary-ticket filters

Link to this setting ↗

Toggle

Pickup

On shows the Pickup held-order filter. Off hides it; the underlying orders are not deleted.

Where you’ll see it

Temporary-ticket filters

Link to this setting ↗

Toggle

Delivery

On shows the Delivery held-order filter. Off hides it; the underlying orders are not deleted.

Where you’ll see it

Temporary-ticket filters

Link to this setting ↗

Toggle

Temporary Ticket Section

On exposes the temporary-ticket or held-order section. Off hides that entry point.

Where you’ll see it

Held orders

Link to this setting ↗

Toggle

Temporary Ticket Combine Button

On shows the combine or merge control for held orders. Off hides it. Order eligibility still determines whether a merge can proceed.

Where you’ll see it

Held-order merge

Link to this setting ↗

Toggle

Force Close All Orders

Allows force-completion treatment for all eligible held orders. The Payment page Force Complete control must also be enabled, and refund guards still apply.

Where you’ll see it

Held orders and payment

Link to this setting ↗

Toggle

Group Temporary Tickets

On groups temporary tickets in the held-order UI. Off uses the ungrouped presentation.

Where you’ll see it

Held-order list

Link to this setting ↗

Merchant guide / 09

Product Display

11 settings explained · Reference guide — change settings inside your POS.

Controls product-entry, inventory UI, price display and SKU behavior. Display settings do not automatically change the underlying product price.

Screen 07 · Product Display
Product Display settings screen with demo values
Product Display in the Settings screen with demo values. Additional controls may be below the visible scroll area.

See the affected screen or receipt example.

Toggle

Product Inventory Management

On exposes the Stock control in product details. Off hides it. It does not automatically alter stock quantities.

Where you’ll see it

Product stock controls

Link to this setting ↗

Toggle

Quick Sale

On exposes Quick Sale or custom-item entry. Off hides that entry point.

Where you’ll see it

POS custom item

Link to this setting ↗

Toggle

Cart Product Instructions

On shows item-instruction controls for cart products. Off hides those controls; existing notes remain in order data.

Where you’ll see it

Cart item notes

Link to this setting ↗

Dropdown

Custom Product Format for Unit-Based

Choose Popup or In-built custom-product entry for unit-based items. This changes the entry UI rather than product pricing rules.

Where you’ll see it

Custom product entry

Link to this setting ↗

Dropdown

SKU Lookup Mode

Exact Match uses strict SKU matching; Flexible Search uses the flexible lookup path. Use the mode that matches the catalog and scanner workflow.

Where you’ll see it

SKU lookup

Link to this setting ↗

Toggle

Display Product Add/Remove Time

On shows recorded item add or remove times in cart details and quick-order views. Off hides those timestamps.

Where you’ll see it

Cart and order quick view

Link to this setting ↗

Toggle

Display Base Price in Cart

On shows base-price information in cart product rows. Off uses the normal cart presentation; charged totals are still calculated separately.

Where you’ll see it

Cart product prices

Link to this setting ↗

Toggle

Show Card Price in Pos

On shows card pricing in supported POS price displays. Off hides the extra card-price display. It does not switch payment processors.

Where you’ll see it

POS price display

Link to this setting ↗

Toggle

Enable Custom Price Popup for $0 Items

On opens custom-price entry for a selected zero-price item without extras. Off skips this specific prompt. It is separate from Enable Zero Price Popup.

Where you’ll see it

Product selection

Link to this setting ↗

Toggle

Calculator

On shows the catalog calculator area. Off hides it.

Where you’ll see it

POS catalog calculator

Link to this setting ↗

Toggle

Enable Zero Price Popup

On allows the zero-price prompt in matching SKU and option-selection paths. This is a separate code path from the zero-price item-without-extras setting.

Where you’ll see it

SKU and product price entry

Link to this setting ↗

Merchant guide / 10

Payment Setup

18 settings explained · Reference guide — change settings inside your POS.

Configure this station and its local service addresses. Printer IP Address here means the local print-server host. The actual desktop receipt-printer address belongs in Desktop Printer Setting.

Screen 08 · Payment Setup
Payment Setup settings screen with demo values
Payment Setup in the Settings screen with demo values. Additional controls may be below the visible scroll area.

See the affected screen or receipt example.

Input

Terminal Id

Enter the configured terminal or register identifier. It appears for enabled payment integrations and is read-only until Edit is selected. Use the provider-configured identifier; this is not an IP address or auth key.

Where you’ll see it

Payment terminal routing

Link to this setting ↗

Action

Terminal Id Edit or Save

Edit unlocks Terminal Id; Save locks the field again. Use Save and Close to persist the overall settings.

Where you’ll see it

Terminal identifier editing

Link to this setting ↗

Input

Terminal Name

Enter a descriptive name for this POS station. It is included in relevant order and print payloads.

Where you’ll see it

Station identification and receipts

Link to this setting ↗

Input

Printer IP Address

Enter the local printing-server IP or hostname. Optional http or https is accepted; omit the port and path because SSL Mode selects the port. This is different from the physical printer IP in Desktop Printer Setting.

Where you’ll see it

Local printing APIs

Link to this setting ↗

Dropdown

SSL Mode

NO-SSL selects port 8080; SSL selects 8081 for the local printing server. The chosen server must actually listen on that protocol and port.

Where you’ll see it

Local printing connection

Link to this setting ↗

Input

Local Network IP

Enter the local offline-server IP or hostname, without a port or path. Save and Close normalizes the address. Used by local offline APIs.

Where you’ll see it

Offline POS data connection

Link to this setting ↗

Dropdown

SSL Mode

NO-SSL selects port 6970; SSL selects 6971 for the offline server. It must match the installed local service.

Where you’ll see it

Offline API connection

Link to this setting ↗

Input

Scale Device IP

Enter the scale service base URL, including the protocol, port and trailing slash, for example http://192.168.1.10:6965/. The weight request appends weight_api to this value. This does not configure or calibrate the scale.

Where you’ll see it

Scale integration

Link to this setting ↗

Dropdown

SSL Mode

Stores the displayed cart-port selection of 6965 or 6966. However, the active getCartPort helper ignores this field and returns 6967 or 6968 based on the printer SSL selection. The scale request uses its full Scale Device IP URL instead. Do not rely on this dropdown alone to reroute either service.

Where you’ll see it

Stored port preference with active routing mismatch

Link to this setting ↗

Input

System ID

Enter the local System ID expected by the local integration. This is an identifier, not the business login password.

Where you’ll see it

Local system identification

Link to this setting ↗

Input

Payment Method Fee (%)

Stores the payment-method percentage fee value. No active consumer of surchargePercentage was found outside settings and initialization in this version; do not rely on it alone to change checkout totals.

Where you’ll see it

Saved setting with no confirmed active pricing effect

Link to this setting ↗

Input

Payment Method Fee in configured currency

Stores the payment-method fixed fee value. No active consumer of surchargeCents was found outside settings and initialization in this version; do not assume this field applies a charge.

Where you’ll see it

Saved setting with no confirmed active pricing effect

Link to this setting ↗

Toggle

QR Pay

On enables QR-payment entry points where supported. Off hides or disables them. Payment provider configuration remains necessary.

Where you’ll see it

QR checkout

Link to this setting ↗

Toggle

EBT Cash Option

On exposes EBT Cash where the enabled terminal integration supports it. Off hides that tender option.

Where you’ll see it

Payment tender options

Link to this setting ↗

Toggle

EBT Food Option

On exposes EBT Food where supported. Off hides that option. Eligibility and processor behavior remain provider-dependent.

Where you’ll see it

Payment tender options

Link to this setting ↗

Toggle

Debit Card

On exposes Debit Card payment where supported. Off hides that tender option.

Where you’ll see it

Payment tender options

Link to this setting ↗

Toggle

Order Logs

Enabling requests protected credentials before enabling the local logs state. The additional log UI is implementation-dependent; it is a troubleshooting option rather than a payment setting.

Where you’ll see it

Support and order logs

Link to this setting ↗

Toggle

Enable Manual Payment Button

On enables the Manual Payment button in eligible Payment-page states. Off disables it. Manager approval and payout or refund restrictions still apply.

Where you’ll see it

Payment manual request

Link to this setting ↗

Merchant guide / 11

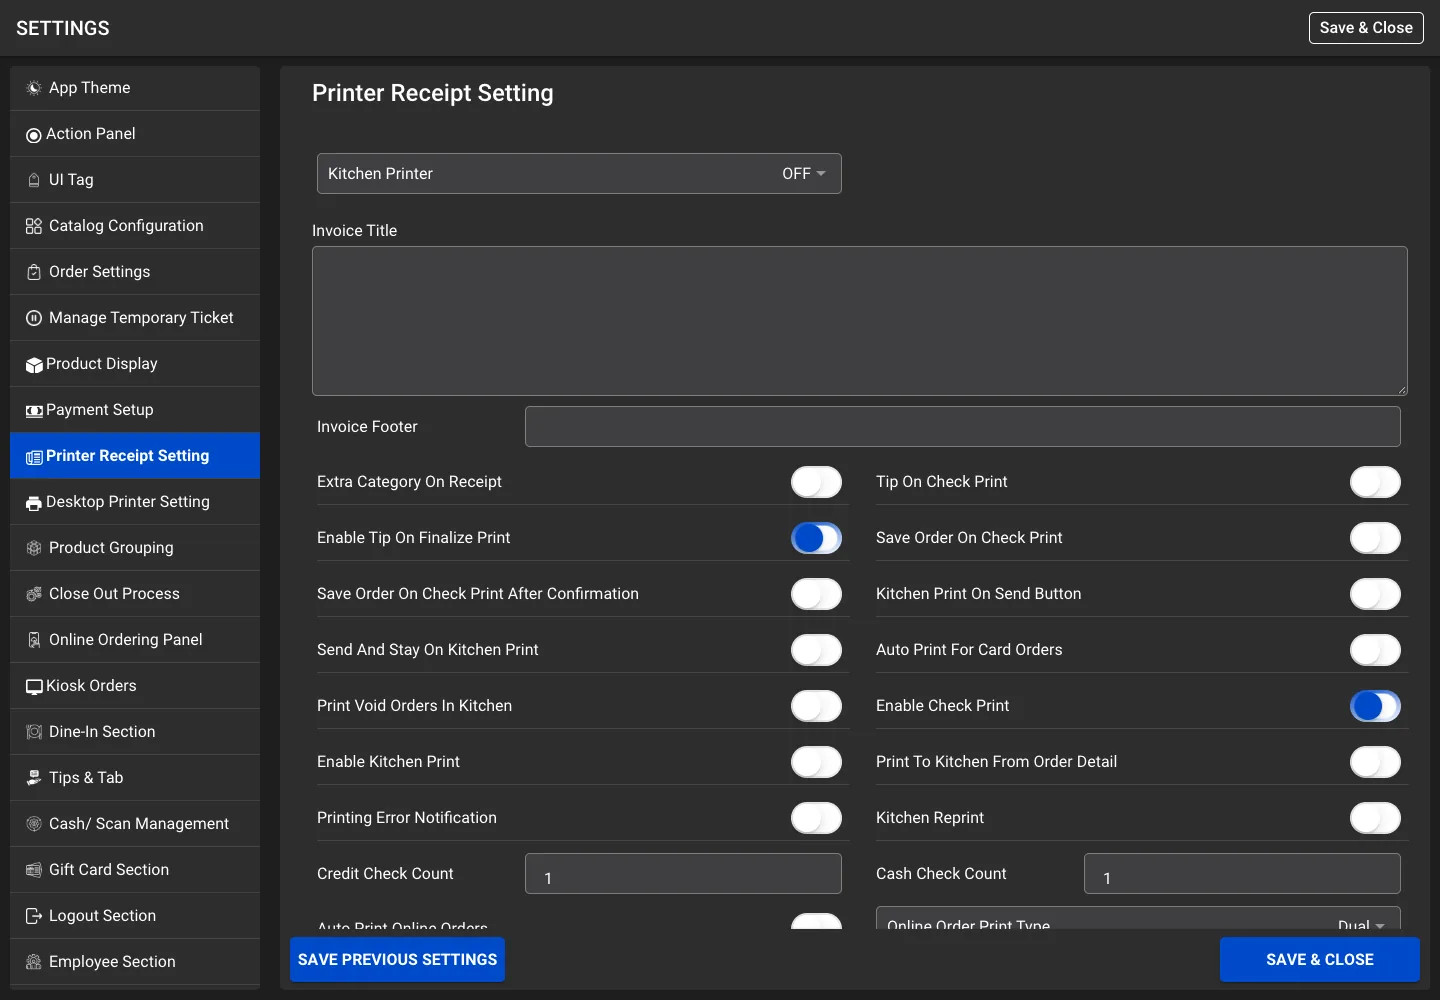
Printer Receipt Setting

22 settings explained · Reference guide — change settings inside your POS.

These settings control when to print and which workflow to use. Local-server templates decide rendering for server-routed jobs. Direct desktop check formatting has a separate settings section.

Screen 09 · Printer Receipt Setting
Printer Receipt Setting settings screen with demo values
Printer Receipt Setting in the Settings screen with demo values. Additional controls may be below the visible scroll area.

See the affected screen or receipt example.

Dropdown

Kitchen Printer

ON enables the configured kitchen-print path; ON After Confirmation requests a choice; OFF disables that setting-controlled path. Separate kitchen buttons, send behavior and auto-order settings also affect printing.

Where you’ll see it

Kitchen-print decision

Link to this setting ↗

Toggle

Extra Category on Receipt

On sends the extras-category-title flag to printing. Off stops that general flag; desktop-specific Extras Category Title can still enable headings.

Where you’ll see it

Receipt extra headings

Link to this setting ↗

Toggle

Tip on check print

On permits tip information in front/check printing paths. Off selects the non-tip variant where used. Tip charging is separate.

Where you’ll see it

Check receipt selection

Link to this setting ↗

Toggle

Enable Tip on Finalize Print

On selects the tip-enabled variant for finalized regular receipts. Off uses the no-tip check variant in the desktop regular-receipt mapping.

Where you’ll see it

Finalized check receipts

Link to this setting ↗

Toggle

Save Order on Check Print

On saves or holds the order when Check Print is used. It is mutually exclusive with the confirmation version. Off leaves other print and hold rules in control.

Where you’ll see it

Cart check-to-hold workflow

Link to this setting ↗

Toggle

Save Order on Check Print After Confirmation

On asks before holding the order on Check Print. Enabling it turns the immediate-save version off.

Where you’ll see it

Cart check-print confirmation

Link to this setting ↗

Toggle

Kitchen Print on Send Button

On routes Send through the kitchen-print workflow in eligible non-fire orders. Off permits the normal hold behavior without this print trigger.

Where you’ll see it

Cart Send action

Link to this setting ↗

Toggle

Send and Stay on Kitchen Print

On retains the cart in supported send/kitchen-to-hold paths instead of clearing it. The actual source action and other hold options determine the result.

Where you’ll see it

Cart after kitchen send

Link to this setting ↗

Toggle

Auto Print for Card Orders

On runs the automatic receipt-print path after eligible card payment. Off leaves receipt selection or manual printing to the remaining workflow.

Where you’ll see it

Post-card-payment printing

Link to this setting ↗

Toggle

Enable Check Print

On shows the Check Print action. Off hides the action; reprints elsewhere can have separate controls.

Where you’ll see it

Cart check button

Link to this setting ↗

Toggle

Enable Kitchen Print

On shows the Kitchen print button. Off hides it. This is separate from automatic online and kiosk kitchen printing.

Where you’ll see it

Cart kitchen button

Link to this setting ↗

Toggle

Printing Error Notification

On allows the configured printing-error notification. Off suppresses that notification, not the underlying printer error.

Where you’ll see it

Printer-error feedback

Link to this setting ↗

Toggle

Kitchen Reprint

On exposes K-Reprint. Off hides that shortcut. It does not reprint automatically.

Where you’ll see it

Cart kitchen reprint

Link to this setting ↗

Input

Credit Check Count

Sets the configured number of credit-check copies. Enter a sensible positive whole number; desktop printing validates the supported copy range.

Where you’ll see it

Credit receipt copies

Link to this setting ↗

Input

Cash Check Count

Sets the configured number of cash-check copies. Enter a sensible positive whole number.

Where you’ll see it

Cash receipt copies

Link to this setting ↗

Toggle

Auto Print Online Orders

On enables online-order auto-print handling when online orders are enabled and the polling flow is active. Off stops that online auto-print trigger; kiosk printing has its own switch.

Where you’ll see it

Online-order automatic printing

Link to this setting ↗

Dropdown

Online Order Print Type

Dual requests check and kitchen output; Kitchen requests kitchen only; Check Print requests a customer check. It applies to online orders, not the kiosk kitchen-only route.

Where you’ll see it

Online-order receipt route

Link to this setting ↗

Merchant guide / 12

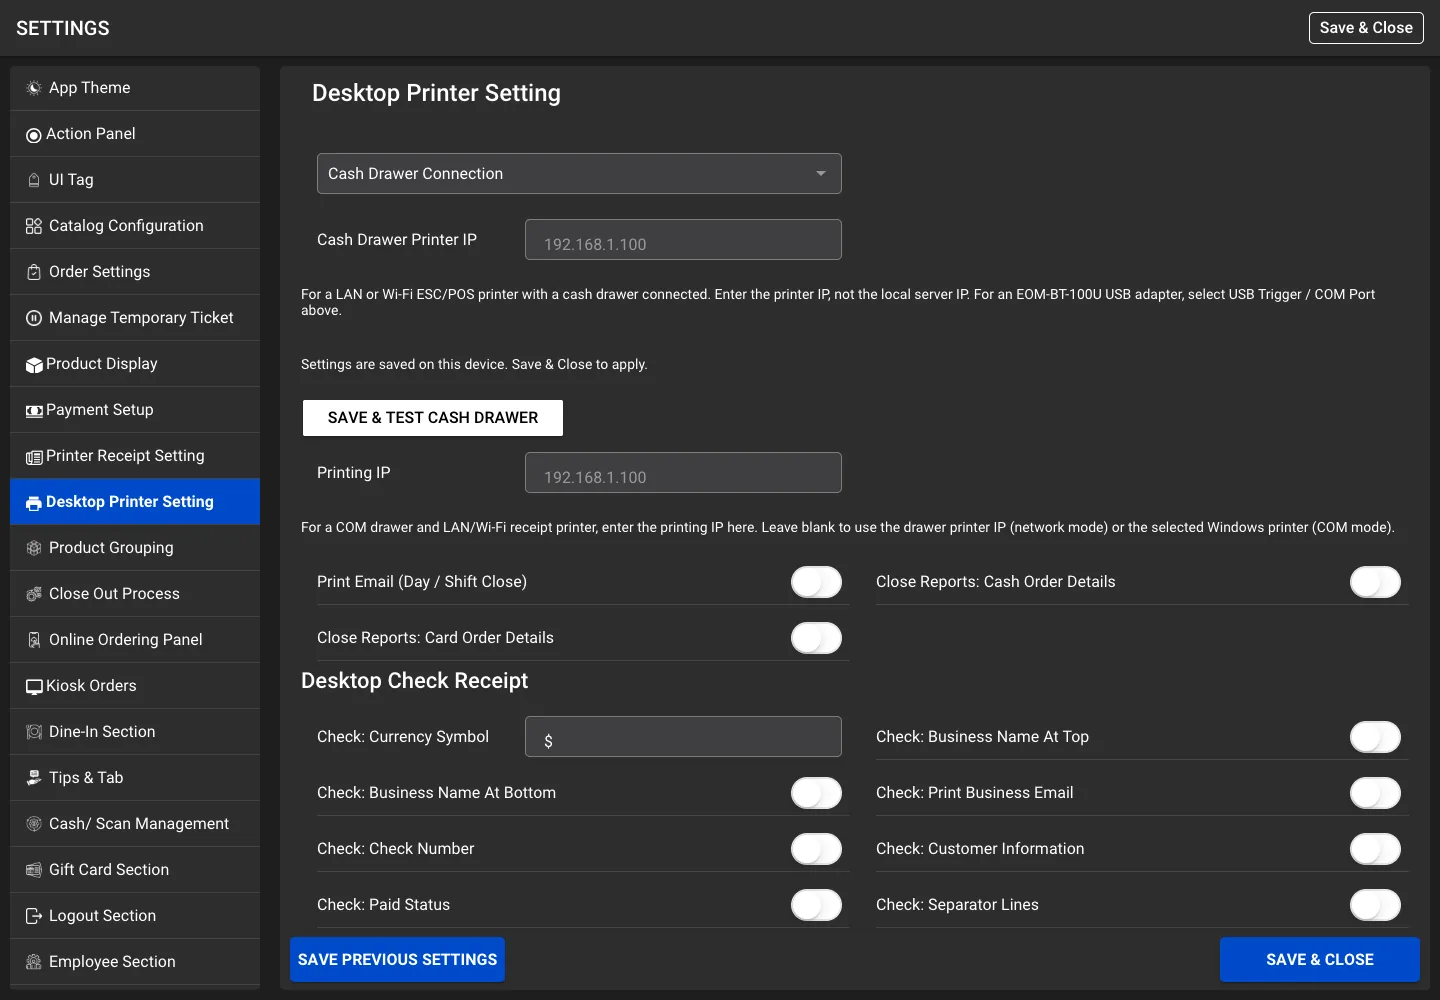
Desktop Printer Setting

31 settings explained · Reference guide — change settings inside your POS.

This tab appears only when runtime_platform is desktop, immediately after Printer Receipt Setting. Choose the cash-drawer route and the receipt-printer route separately when needed. Direct desktop checks use Template 3 only when online is the Boolean true; otherwise they use Template 1.

Screen 10 · Desktop Printer Setting
Desktop Printer Setting settings screen with demo values
Desktop Printer Setting in the Settings screen with demo values. Additional controls may be below the visible scroll area.

See the affected screen or receipt example.

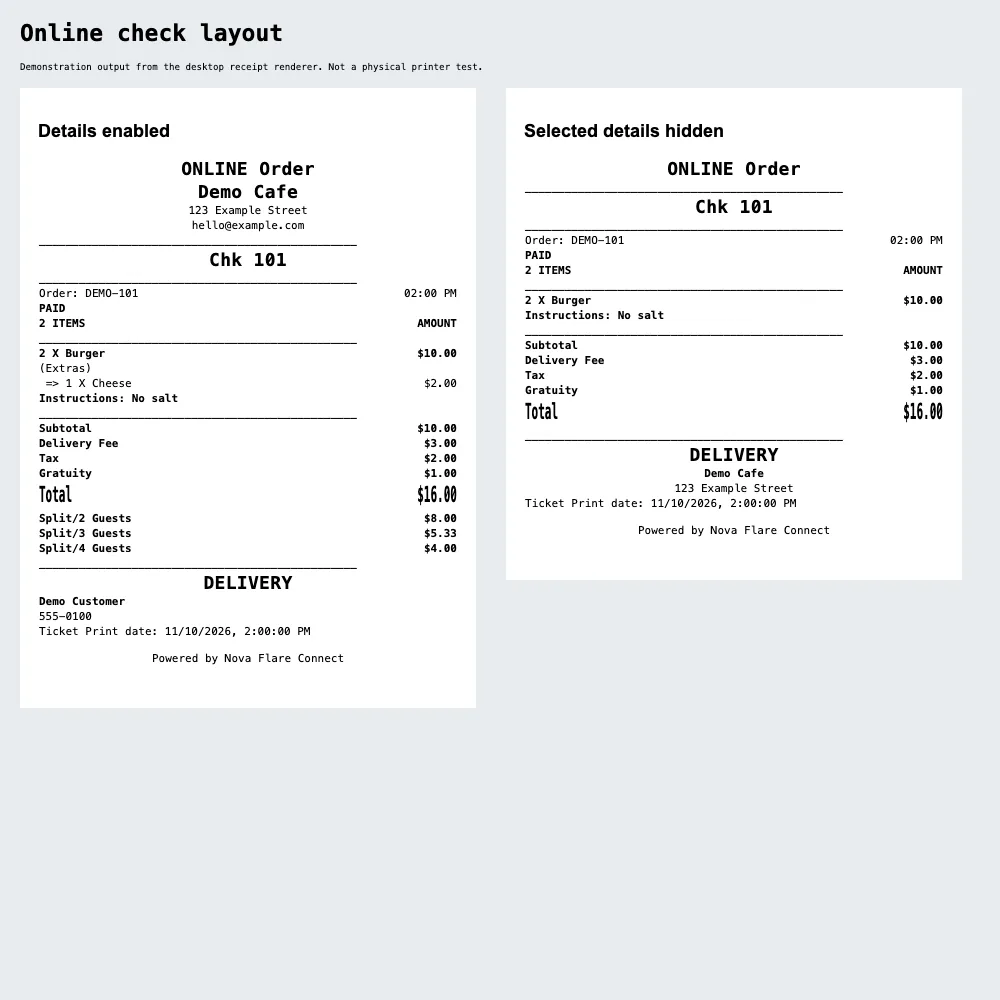
Network defaults: port 9100, drawer pin selector value 0 corresponding to pin 2, paper width 80 mm. The TCP-port, drawer-pin and Receipt Footer Text controls are currently commented out; they cannot be changed through the visible tab. COM Port defaults to COM3. Business at Top defaults on; Bottom, Email, Extras Category Title and Split Amount Suggestions default off. Day or Shift Email defaults on; cash and card detail switches default off.

Dropdown

Cash Drawer Connection

Select how the desktop app opens the drawer. Network sends the drawer pulse through a LAN or Wi-Fi receipt printer. Serial opens the EOM-BT-100U USB trigger through its Windows COM port. This choice also determines the fallback receipt route when Printing IP is empty.

Where you’ll see it

Desktop drawer and receipt routing

Link to this setting ↗

Input

COM Port

Enter the actual Windows port shown in Device Manager, such as COM3. COM3 is the default, not automatic device detection. Only shown for the USB trigger connection; a COM trigger opens the drawer and does not print paper.

Where you’ll see it

Desktop cash drawer

Link to this setting ↗

Input

Cash Drawer Printer IP

Enter the receipt printer IP when the drawer plugs into that printer. This is the physical printer address, not the POS local server address. Network mode uses the stored TCP port, normally 9100.

Where you’ll see it

Desktop cash drawer and fallback receipt printer

Link to this setting ↗

Action

Save & Test Cash Drawer

Saves desktop printer settings and sends a real open-drawer command. Use only with the correct connected drawer. A command-sent message is not physical confirmation that the drawer opened.

Where you’ll see it

Desktop drawer test

Link to this setting ↗

Input

Printing IP

Optional separate LAN or Wi-Fi receipt-printer IP. It overrides the drawer printer for receipts. With a COM drawer, supply this IP or select a Windows Receipt Printer. Blank in network mode falls back to Cash Drawer Printer IP.

Where you’ll see it

Desktop checks and other supported receipts

Link to this setting ↗

Dropdown

Windows Receipt Printer

Choose an installed Windows printer. Appears for a COM drawer when Printing IP is empty. The USB trigger itself is not a printer. Printer names come from the desktop app and installed Windows drivers.

Where you’ll see it

Windows receipt printing

Link to this setting ↗

Action

Refresh Printer List

Reloads installed Windows printers into the selection list. Requires the desktop bridge; it does not install printer drivers.

Where you’ll see it

Windows printer selection

Link to this setting ↗

Toggle

Close Reports: Cash Order Details

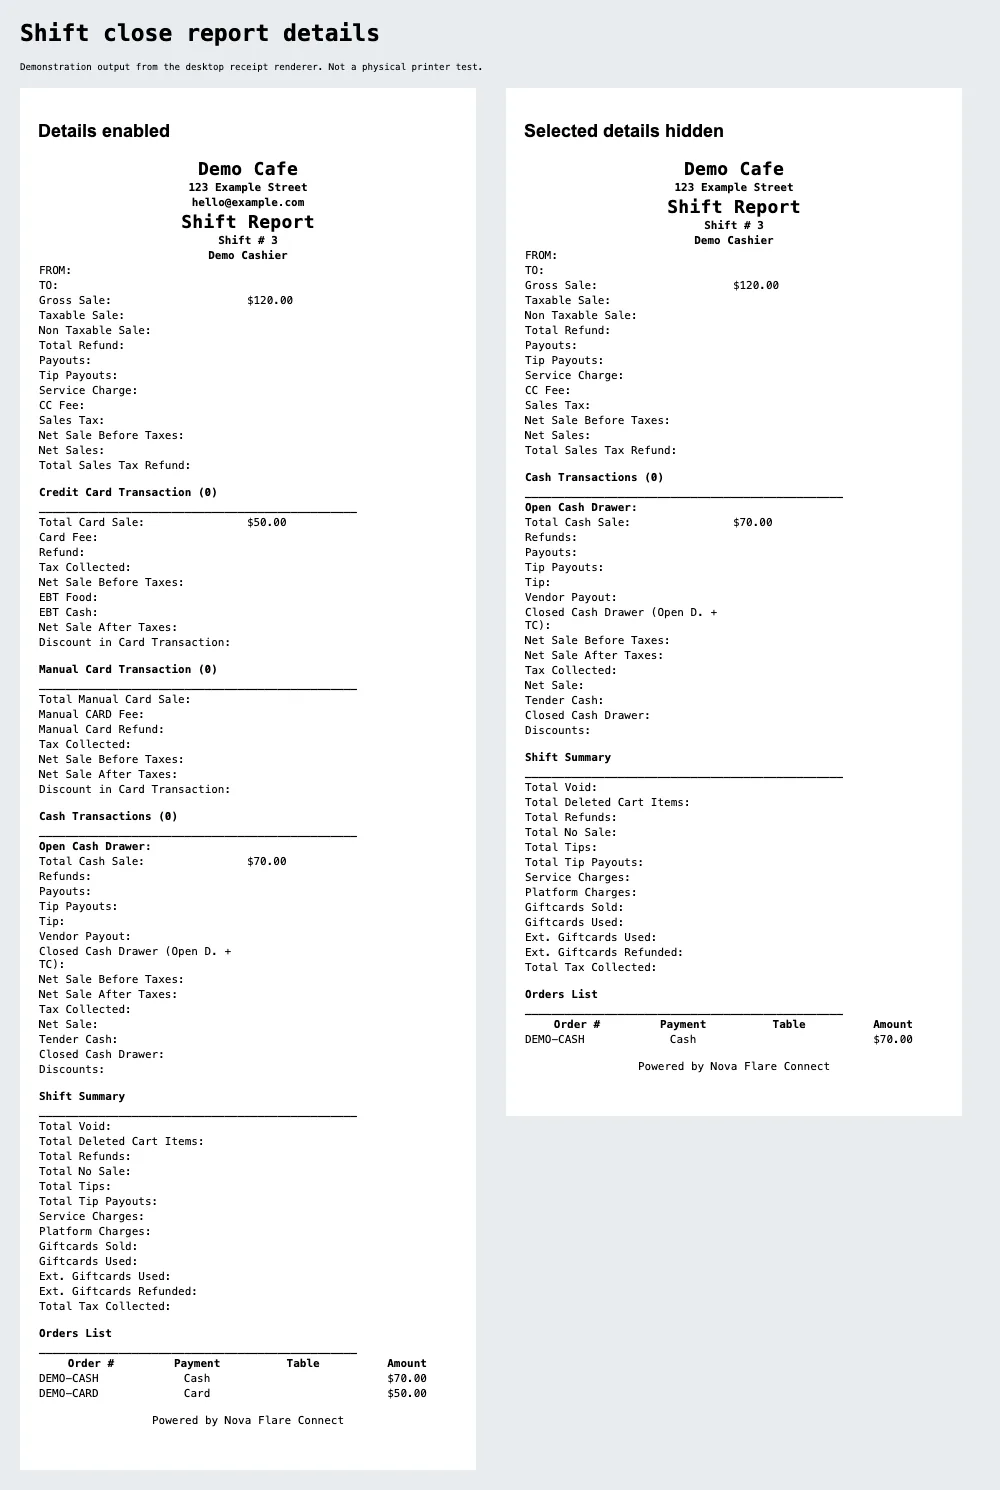
On includes individual cash-order detail rows supplied by the report. Off omits those detail rows; report totals remain. Missing order detail data cannot be created by this setting.

Where you’ll see it

Desktop close reports

Link to this setting ↗

Toggle

Close Reports: Card Order Details

On allows card-order detail rows. The applicable Hide Credit Card Details setting still overrides it. Off omits individual card-order detail rows.

Where you’ll see it

Desktop close reports

Link to this setting ↗

Input

Check: Currency Symbol

Sets the currency text printed beside monetary values, for example $. It changes receipt formatting, not the account currency or exchange rate.

Where you’ll see it

Desktop check templates 1 and 3

Link to this setting ↗

Toggle

Check: Business Name at Top

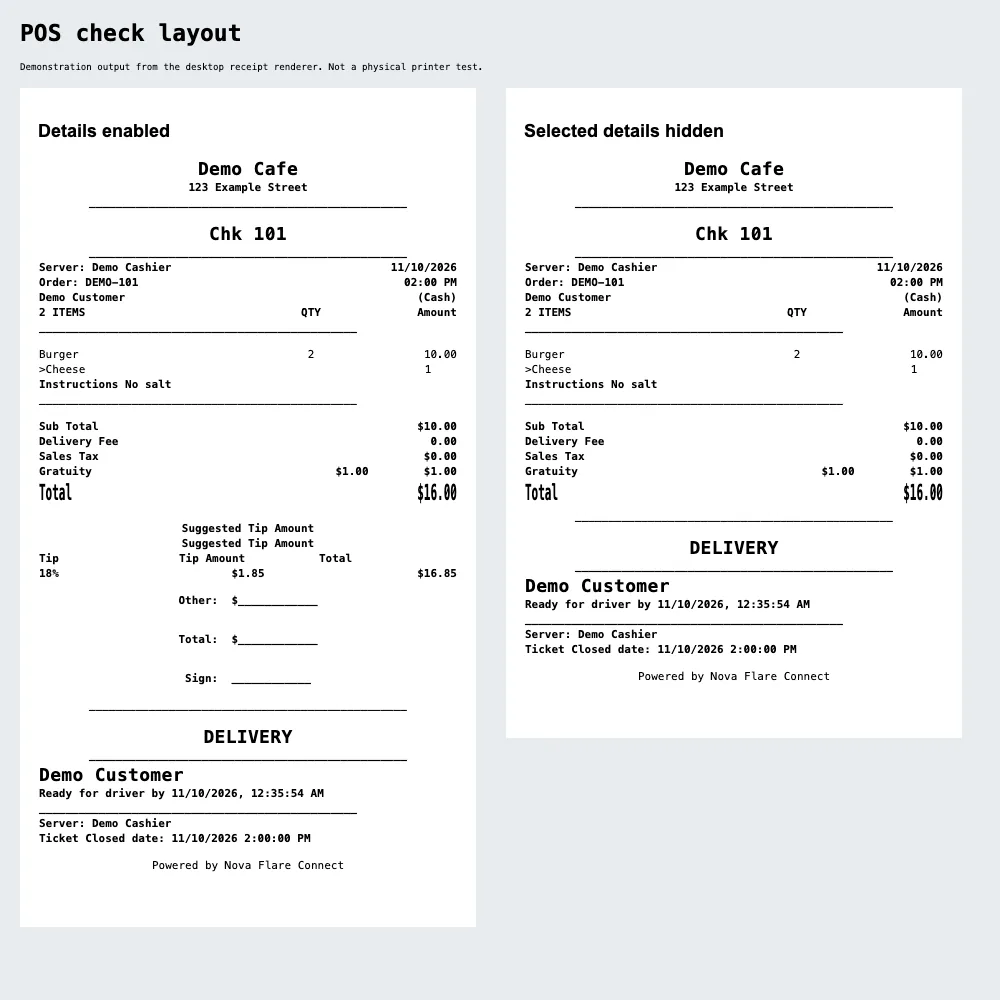
On prints business details at the top and turns the Bottom setting off. The default position is top. Test both templates after changing this setting.

Where you’ll see it

Desktop check header

Link to this setting ↗

Toggle

Check: Business Name at Bottom

On prints business details at the bottom and turns the Top setting off. It relocates business details; it does not duplicate them at both ends.

Where you’ll see it

Desktop check footer

Link to this setting ↗

Toggle

Check: Print Business Email

On prints the supplied business email in the business-information block. Off omits it. An empty email produces no email line.

Where you’ll see it

Desktop check business details

Link to this setting ↗

Toggle

Check: Check Number

On prints the supplied check or invoice number. Off omits the check-number block. It does not generate a new invoice number.

Where you’ll see it

Desktop check identification

Link to this setting ↗

Toggle

Check: Customer Information

On allows customer name, phone and supplied address details. Off hides the customer block. Position also depends on Pickup Delivery Details.

Where you’ll see it

Desktop check customer block

Link to this setting ↗

Toggle

Check: Paid Status

On prints paid-status wording where the template and order data support it. Online cash orders may show NOT PAID. It changes the receipt label, not the transaction payment state.

Where you’ll see it

Desktop check payment status

Link to this setting ↗

Toggle

Check: Separator Lines

On prints template separator rules. Off removes the separators controlled by this flag; it does not change totals.

Where you’ll see it

Desktop check layout

Link to this setting ↗

Toggle

Check: Item Prices

On prints item price columns. Off hides item prices; totals still use the order amounts.

Where you’ll see it

Desktop check item rows

Link to this setting ↗

Toggle

Check: Item Extras

On prints selected item extras and modifiers. Off omits those rows without removing extras from the actual order or total.

Where you’ll see it

Desktop check item extras

Link to this setting ↗

Toggle

Check: Extras Category Title

On includes extras-category headings when extras are printed. The general Extra Category on Receipt setting can also enable headings, so turn both off to suppress them.

Where you’ll see it

Desktop check extras headings

Link to this setting ↗

Toggle

Check: Item Instructions

On prints item instructions such as No salt. Off hides those instructions on the check; the stored order is unchanged.

Where you’ll see it

Desktop check instructions

Link to this setting ↗

Toggle

Check: Cash / Card Amounts

Controls the additional cash and card amounts block when the payload supplies it. It does not convert prices or replace payment calculations; Template 1 also uses its dual-pricing layout.

Where you’ll see it

Desktop check payment amounts

Link to this setting ↗

Toggle

Check: Pickup / Delivery Details

Controls customer and pickup or delivery information placement. In Template 3, on places the customer block after totals; off places it earlier. Customer Information must also be enabled.

Where you’ll see it

Desktop check customer placement

Link to this setting ↗

Toggle

Check: Split Amount Suggestions

On adds Split 2 Guests, Split 3 Guests and Split 4 Guests suggestions. Off removes those suggestions. Default is off. This does not split the real transaction.

Where you’ll see it

Desktop check suggested split amounts

Link to this setting ↗

Toggle

Check: Gratuity Amount / Suggested Tip Total

Allows the gratuity amount or suggested-tip total supported by the selected template. It changes printed information, not whether the order is charged a tip.

Where you’ll see it

Desktop check tip information

Link to this setting ↗

Toggle

POS Check: Suggested Tips

On allows suggested-tip lines in POS Template 1. They can still be suppressed by the receipt type or finalization state. Off hides the suggestions.

Where you’ll see it

POS desktop checks

Link to this setting ↗

Toggle

POS Check: Payment Terminal Receipt

On appends supplied payment-terminal receipt text in Template 1. Off omits it. There must be terminal receipt text in the print payload.

Where you’ll see it

POS desktop terminal receipt

Link to this setting ↗

Dropdown

Paper Width

Choose 80 mm or 58 mm to match the installed paper. This controls supported receipt rendering width; the Windows driver must also use the matching paper size.

Where you’ll see it

Desktop receipt layout

Link to this setting ↗

Action

Save & Test No Sale Receipt

Saves the settings and sends a sample No Sale receipt to the selected receipt route. This is a real printer test, not an on-screen preview.

Where you’ll see it

Desktop No Sale receipt

Link to this setting ↗

Action

Save & Test Check Print

Saves settings and sends a sample check to the configured receipt printer. Use it after changing printer routing or check formatting.

Where you’ll see it

Desktop check test

Link to this setting ↗

Merchant guide / 13

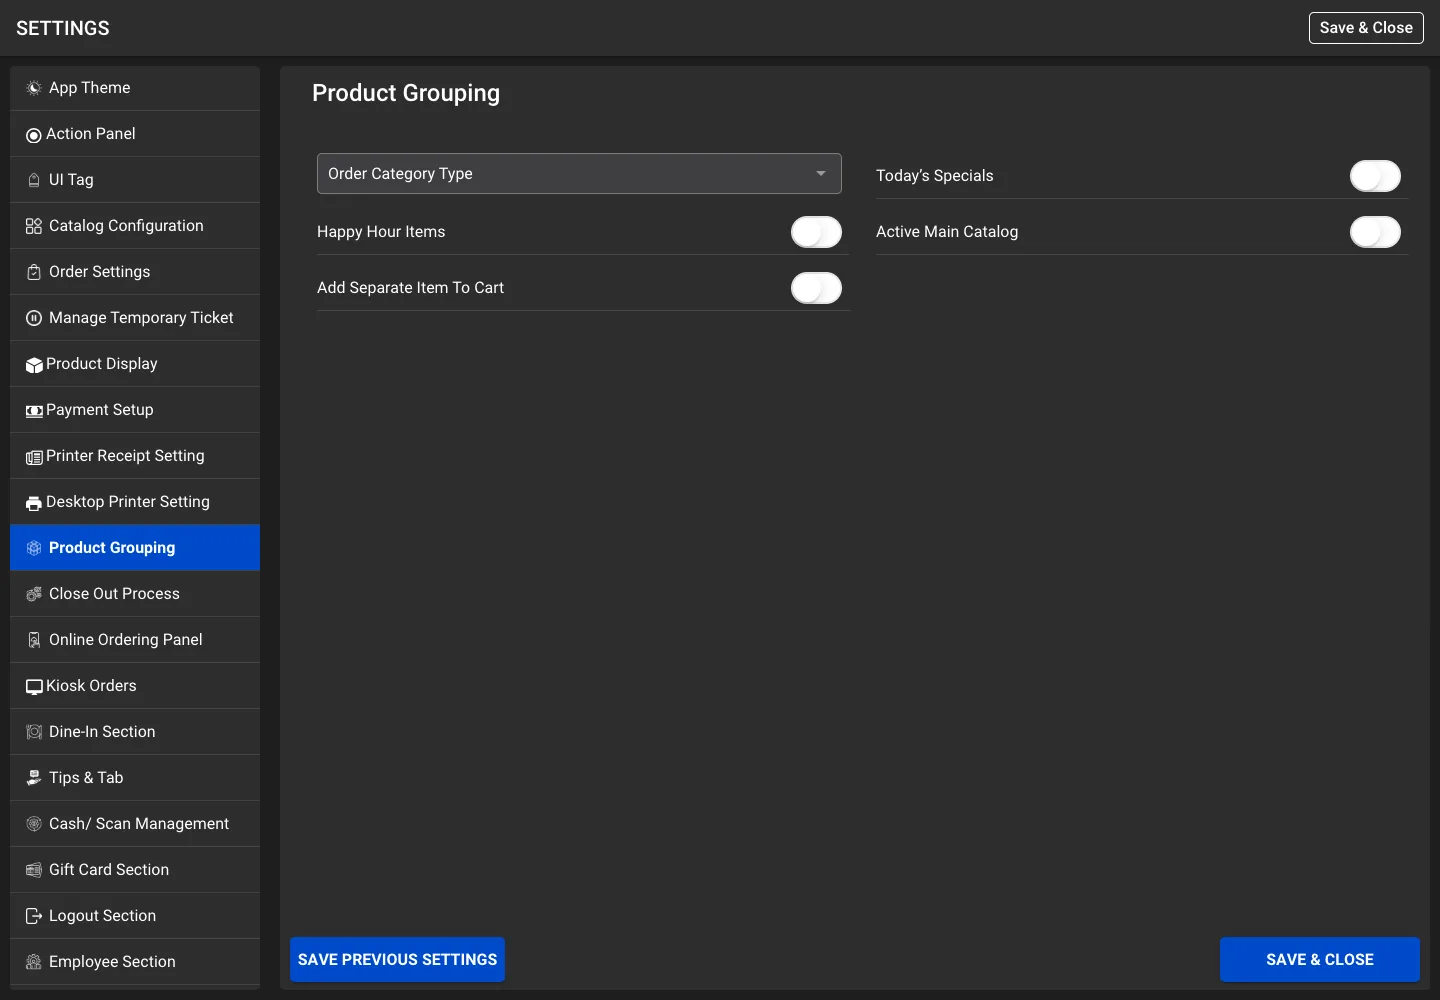
Product Grouping

5 settings explained · Reference guide — change settings inside your POS.

Controls item grouping and catalog shortcuts. Some legacy catalog shortcut switches are still saved but their buttons are commented out in the current catalog template.

Screen 11 · Product Grouping
Product Grouping settings screen with demo values
Product Grouping in the Settings screen with demo values. Additional controls may be below the visible scroll area.

Dropdown

Order Category Type

No Categorization disables both grouping actions. Attributes enables Fire; Manual enables Line. This controls order-item grouping and kitchen-send behavior.

Where you’ll see it

Cart grouping and kitchen firing

Link to this setting ↗

Toggle

Today’s Specials

Stores the Today’s Specials switch. Its visible category shortcut is currently commented out; no active shortcut effect is confirmed in this catalog template.

Where you’ll see it

Stored catalog setting

Link to this setting ↗

Toggle

Happy Hour Items

Stores the Happy Hour switch. Its visible category shortcut is currently commented out; no active shortcut effect is confirmed in this catalog template.

Where you’ll see it

Stored catalog setting

Link to this setting ↗

Toggle

Active Main Catalog

On exposes main-catalog selection and applies configured super-category selection behavior. Off removes that setting-controlled catalog selector.

Where you’ll see it

Side menu and catalog selection

Link to this setting ↗

Toggle

Add Separate Item to Cart

On adds matching selections as separate cart rows. Off permits the normal merge logic when item, extras, instructions and other merge conditions match.

Where you’ll see it

Cart line merging

Link to this setting ↗

Merchant guide / 14

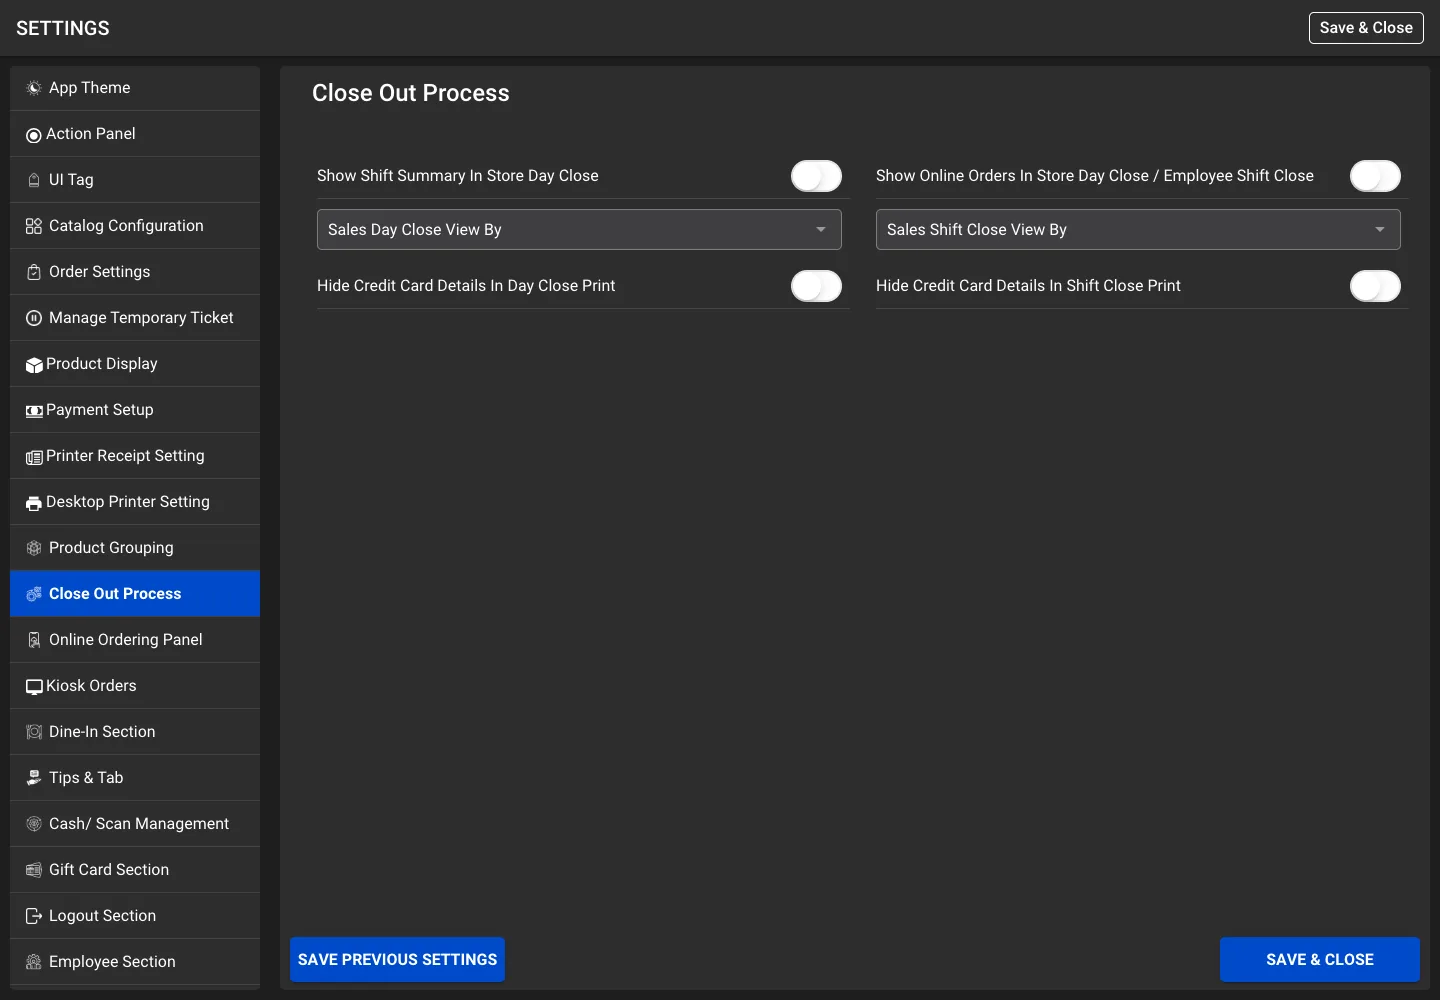
Close Out Process

6 settings explained · Reference guide — change settings inside your POS.

Controls report data selection and printed detail visibility. The report API must return the requested data. Desktop card-detail printing also depends on the Desktop Printer Setting detail switches.

Screen 12 · Close Out Process
Close Out Process settings screen with demo values
Close Out Process in the Settings screen with demo values. Additional controls may be below the visible scroll area.

See the affected screen or receipt example.

Toggle

Show Shift Summary in Store Day Close

On asks the backend to include shift summary data in day-close results. Off omits that request flag. Report visibility also depends on returned data.

Where you’ll see it

Day Close data request

Link to this setting ↗

Toggle

Show Online Orders in Store Day Close / Employee Shift Close

Controls whether online orders are requested for store day-close and employee shift-close calculations. The backend must honor the request.

Where you’ll see it

Close-report data

Link to this setting ↗

Dropdown

Sales Day Close View By

Choose no sales grouping, Super Category, Category, Item or Department. None hides the corresponding grouped-sales section; other choices request and display that grouping.

Where you’ll see it

Day Close sales summary

Link to this setting ↗

Dropdown

Sales Shift Close View By

Choose the equivalent grouping for employee shift-close reports. This is independent of the day-close selection.

Where you’ll see it

Shift Close sales summary

Link to this setting ↗

Toggle

Hide Credit Card Details in Day Close print

On hides card transaction details in day-close print output. On desktop it overrides Close Reports Card Order Details. Off merely allows details when the other print flag and report data permit them.

Where you’ll see it

Day Close printed card details

Link to this setting ↗

Toggle

Hide Credit Card Details in Shift Close print

Equivalent hide override for shift-close print output. It is separate from the day-close switch.

Where you’ll see it

Shift Close printed card details

Link to this setting ↗

Merchant guide / 15

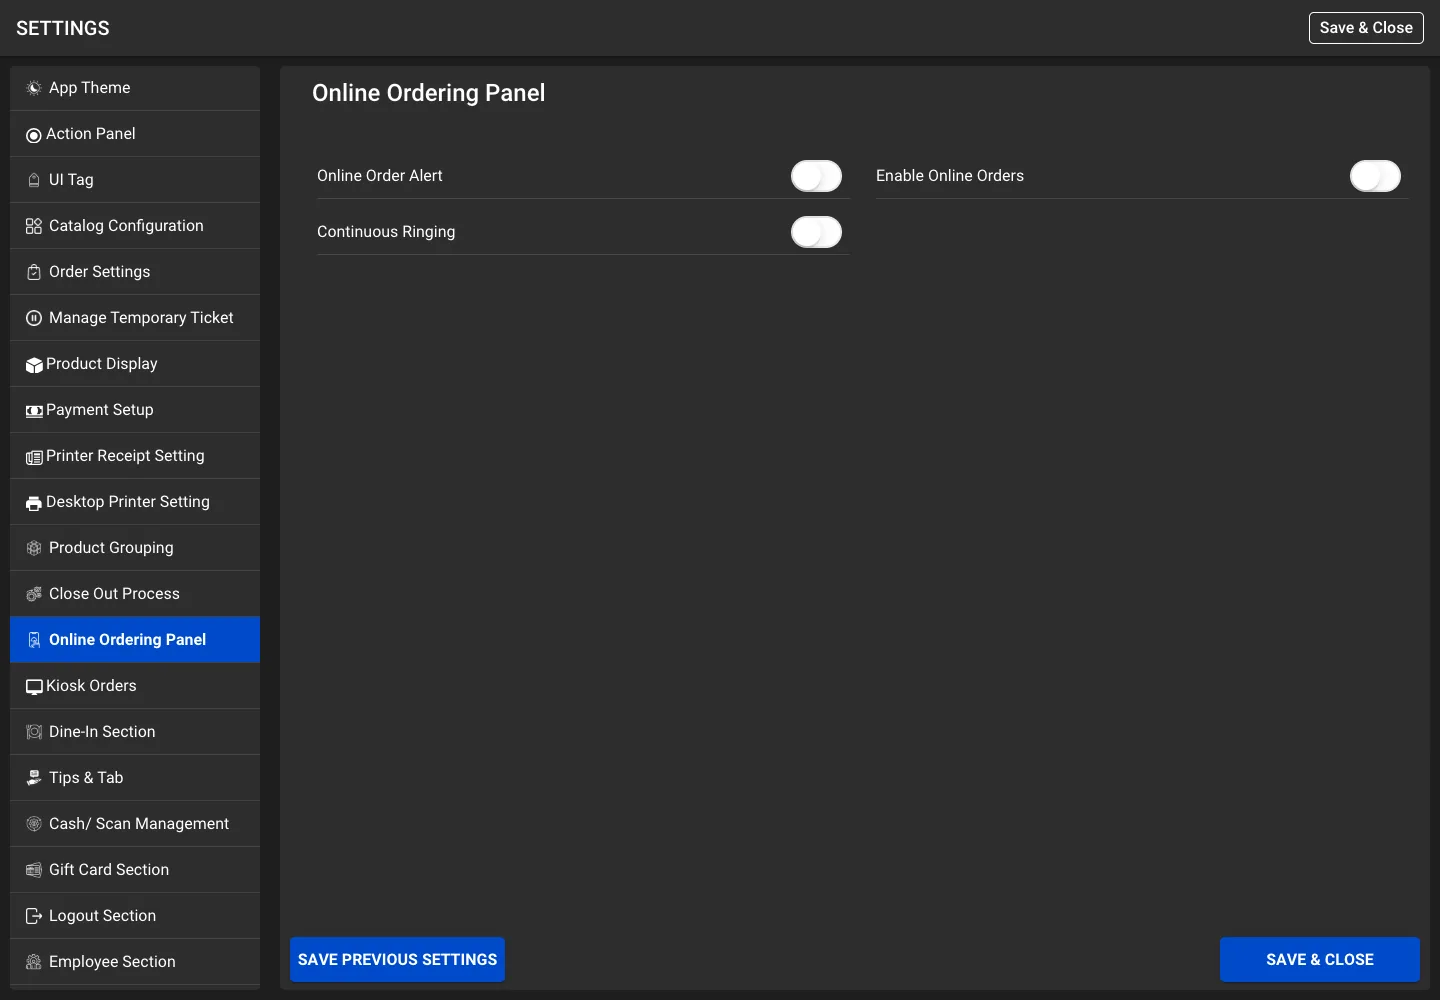
Online Ordering Panel

3 settings explained · Reference guide — change settings inside your POS.

Online-order retrieval, alerts and ringtone behavior are separate from automatic printing. Auto Print Online Orders and Online Order Print Type are in Printer Receipt Setting.

Screen 13 · Online Ordering Panel
Online Ordering Panel settings screen with demo values
Online Ordering Panel in the Settings screen with demo values. Additional controls may be below the visible scroll area.

See the affected screen or receipt example.

Toggle

Online Order Alert

On shows the legacy pending-online-order alert. Off suppresses that popup. Kiosk notifications use their own popup setting.

Where you’ll see it

Online-order popup

Link to this setting ↗

Toggle

Enable Online Orders

On permits online-order polling, list updates and related flows. Off ignores online orders in the shared polling response; kiosk handling can remain enabled independently.

Where you’ll see it

Online order retrieval and list

Link to this setting ↗

Toggle

Continuous Ringing

On repeats the online-order ringtone in the existing pending-order flow. Off uses the non-continuous behavior. This is not the kiosk ringing switch.

Where you’ll see it

Online-order sound

Link to this setting ↗

Merchant guide / 16

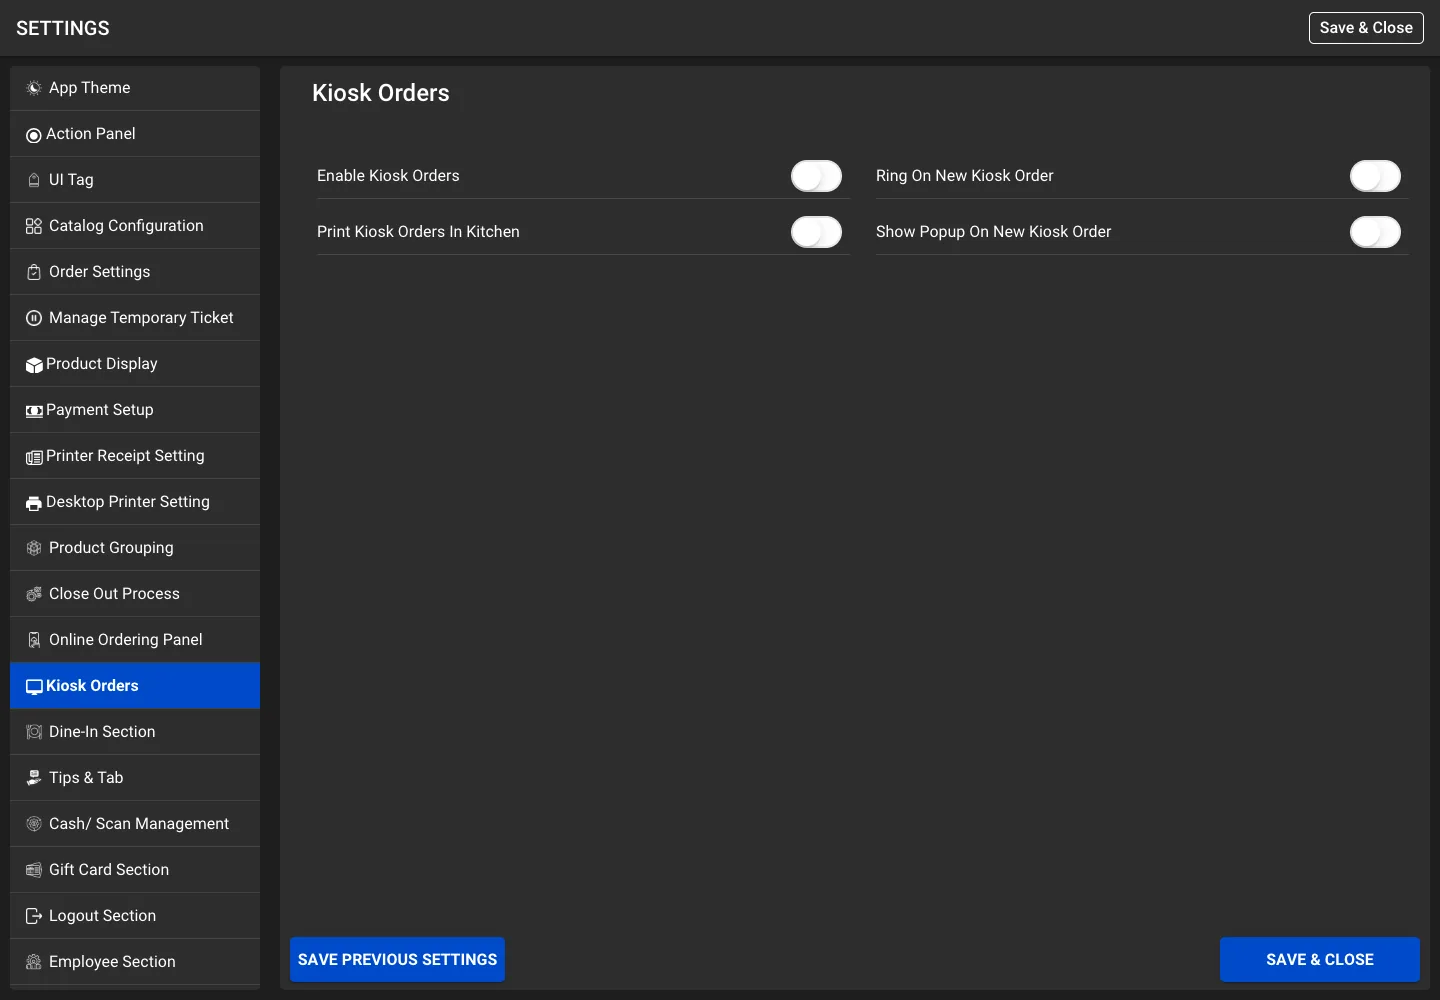
Kiosk Orders

4 settings explained · Reference guide — change settings inside your POS.

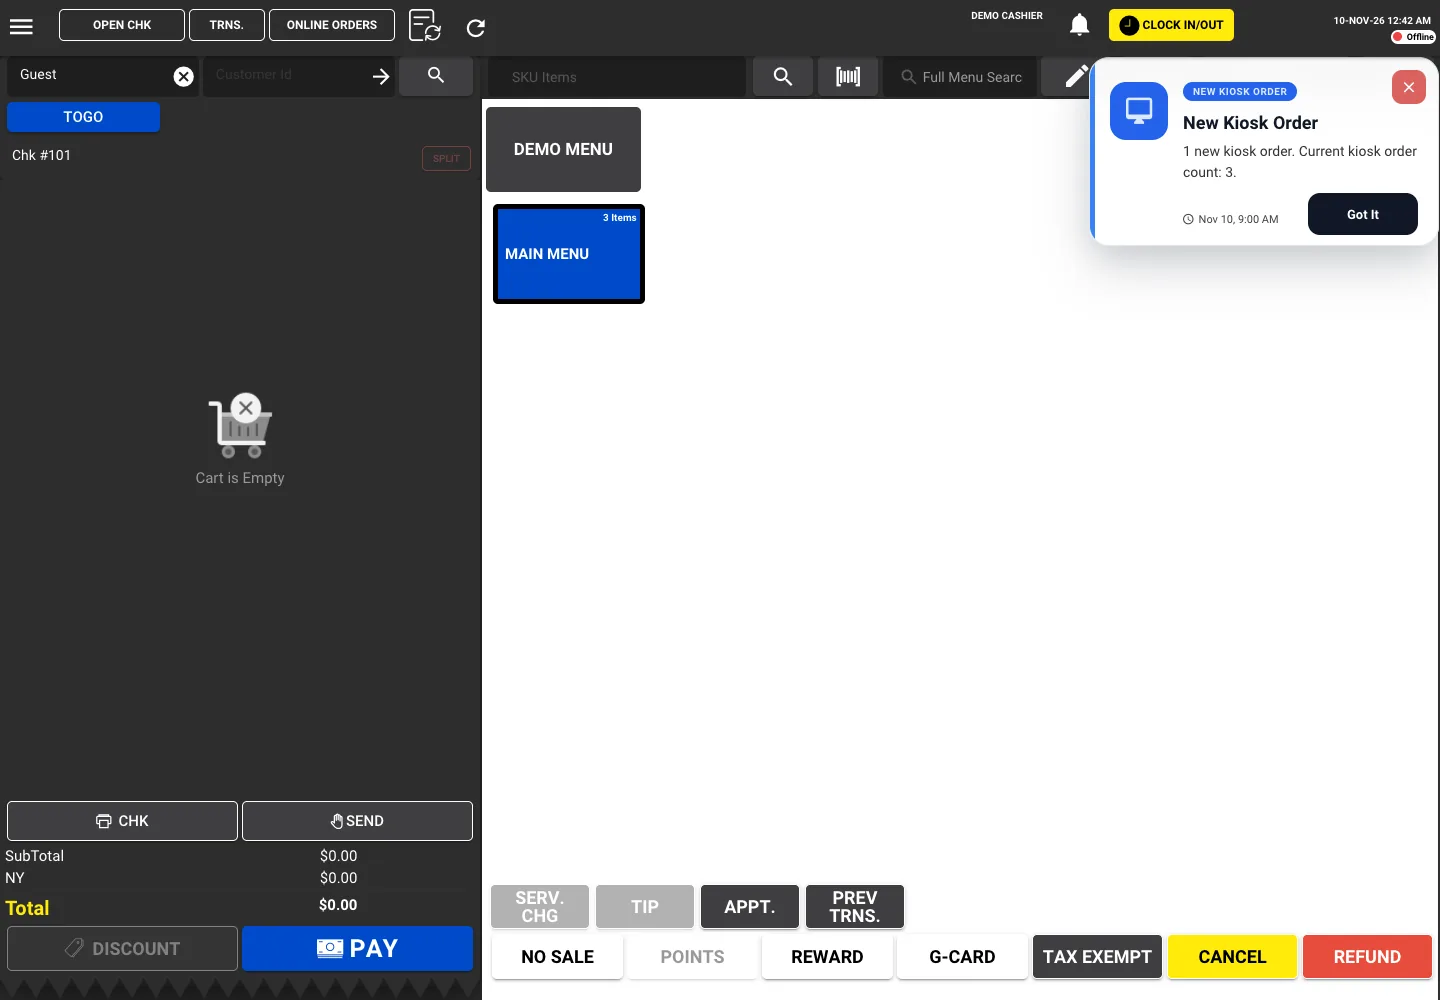
Kiosk kitchen printing uses businessAppsOrders.kiosk_order and accepts only status ACCEPTED. Ringing and popup behavior use validateClockIn.kiosk_orders, a count. Kiosk orders are excluded from the online-order list and legacy online popup.

Screen 14 · Kiosk Orders
Kiosk Orders settings screen with demo values
Kiosk Orders in the Settings screen with demo values. Additional controls may be below the visible scroll area.

See the affected screen or receipt example.

Toggle

Enable Kiosk Orders

Master switch for kiosk handling. On permits accepted kiosk-order processing and count-based notification handling. Off ignores kiosk orders for these flows. Default is off.

Where you’ll see it

Kiosk processing

Link to this setting ↗

Toggle

Ring on New Kiosk Order

On rings when validateClockIn reports a kiosk_orders count greater than the previous valid count. The first count establishes a baseline without ringing. Enable Kiosk Orders is also required.

Where you’ll see it

Kiosk notification sound

Link to this setting ↗

Toggle

Show Popup on New Kiosk Order

On permits the new-kiosk-order popup when the count increases. Off suppresses that popup. The shared notification list can still show the kiosk count summary; selecting it opens transactions.

Where you’ll see it

Kiosk popup and notification list

Link to this setting ↗

Merchant guide / 17

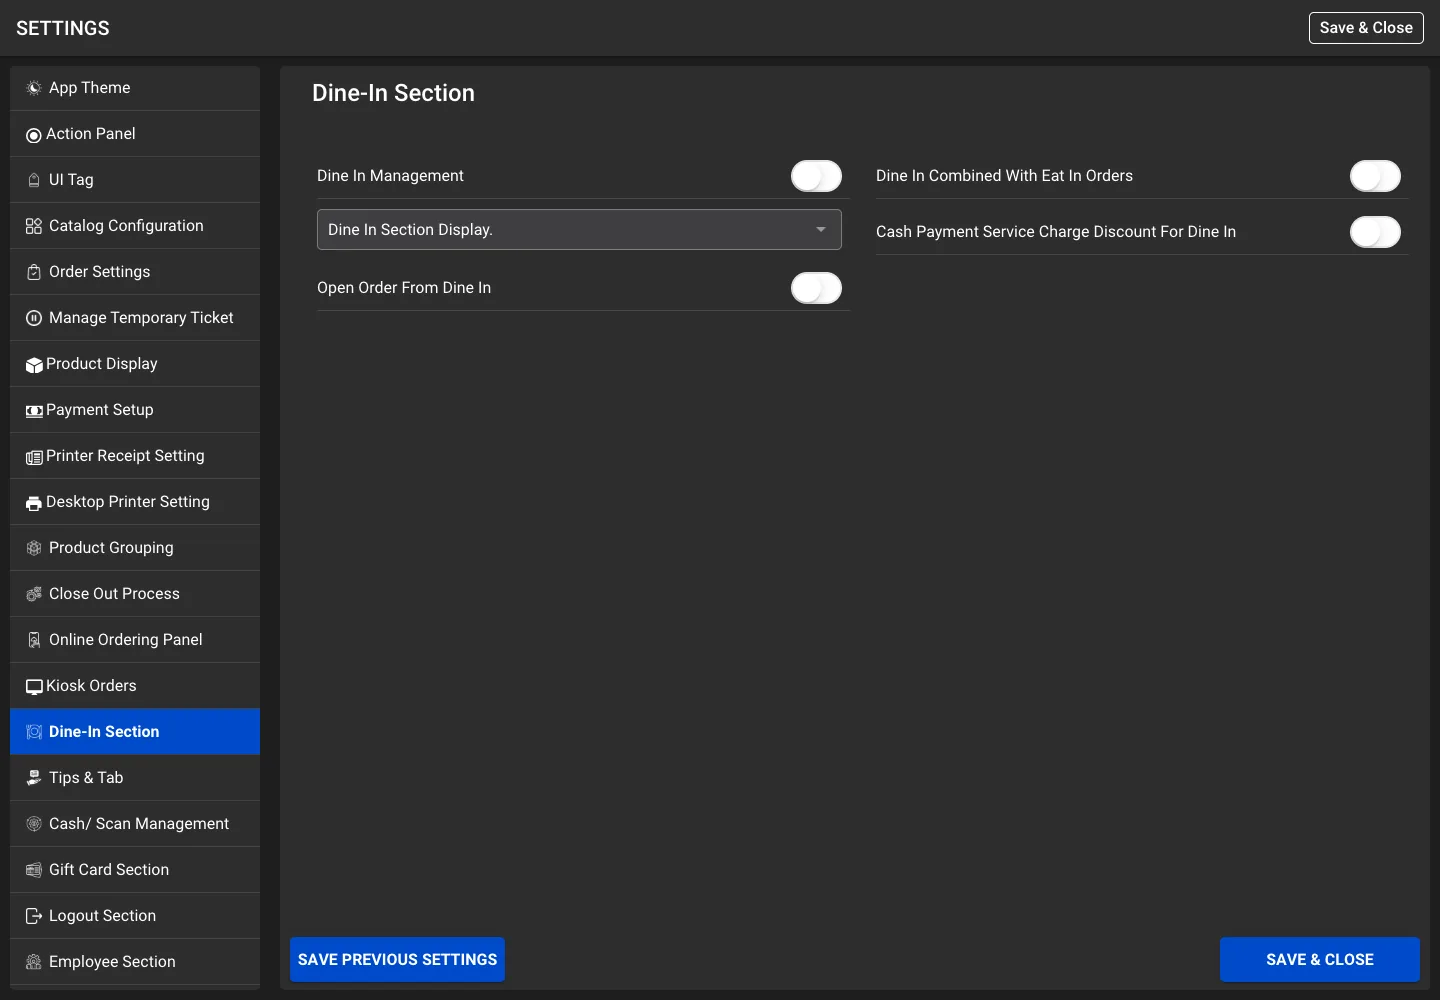
Dine In Section

5 settings explained · Reference guide — change settings inside your POS.

This section is available only with table-access permission. Tables and rooms must already exist; these controls select how the POS uses them.

Screen 15 · Dine In Section
Dine In Section settings screen with demo values
Dine In Section in the Settings screen with demo values. Additional controls may be below the visible scroll area.

Toggle

Dine In Management

On enables dine-in or table-management entry points. Off hides the setting-controlled entry. The entire settings section also requires table-access permission.

Where you’ll see it

Table management

Link to this setting ↗

Toggle

Dine In combined with Eat In Orders

Combines dine-in and eat-in behavior in table selection and held-order filtering. It can hide the separate Eat-In held-order segment and trigger table selection for eat-in orders.

Where you’ll see it

Table selection and held orders

Link to this setting ↗

Dropdown

Dine In Section Display.

Direct opens the dine-in page; Alert uses the table alert; None skips the normal setting-driven prompt. The combined dine-in/eat-in mode can still trigger table selection.

Where you’ll see it

Catalog-to-table selection

Link to this setting ↗

Toggle

Cash Payment Service Charge Discount for Dine In

Stores the cash service-charge discount preference, but the matching payment subtraction is commented out in this version. Do not expect it to remove a service charge.

Where you’ll see it

No confirmed active cash-discount effect

Link to this setting ↗

Toggle

Open Order From Dine In

On permits opening an occupied table order into the cart. Off prevents that action and displays feedback.

Where you’ll see it

Occupied-table action

Link to this setting ↗

Merchant guide / 18

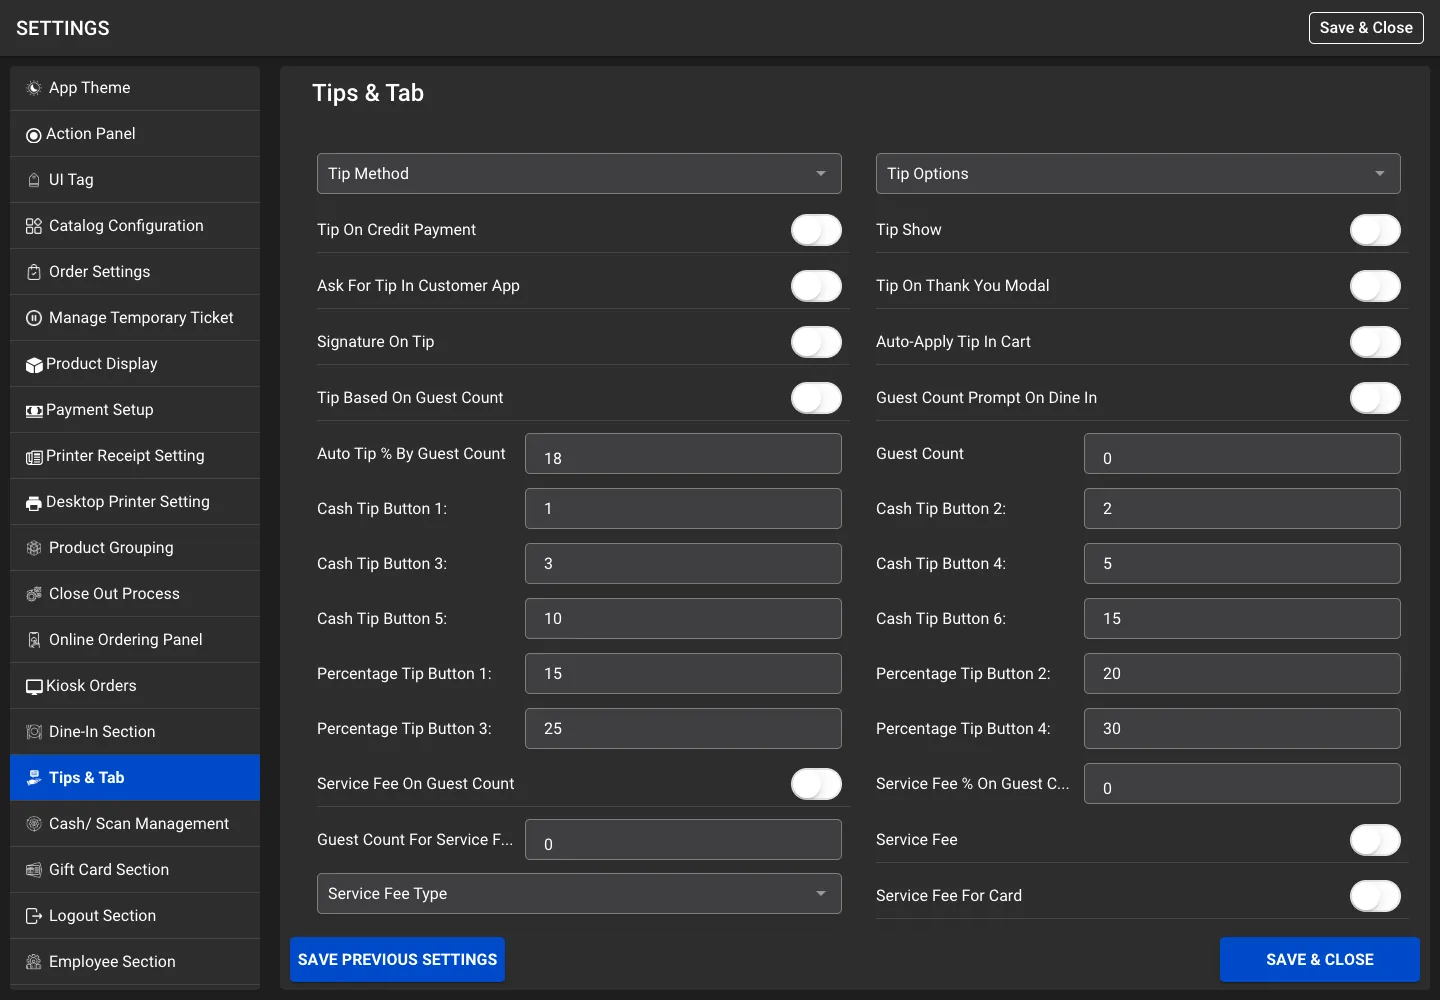
Tips and Tab

29 settings explained · Reference guide — change settings inside your POS.

Controls tip entry, customer-facing tip flows, guest-count rules and service fees. Tip presets are also reused on the service-charge keypad. Review amounts on a sample order before using new rules.

Screen 16 · Tips and Tab
Tips and Tab settings screen with demo values
Tips and Tab in the Settings screen with demo values. Additional controls may be below the visible scroll area.

See the affected screen or receipt example.

Dropdown

Tip Method

Sets the working tip method to a currency amount or percentage. Other automatic or guest-count rules can change the selected method.

Where you’ll see it

Tip entry

Link to this setting ↗

Dropdown

Tip Options

Controls the available tip choices: Cash, Percentage or both. It is separate from the current Tip Method.

Where you’ll see it

Tip-entry method options

Link to this setting ↗

Toggle

Tip on Credit Payment

On requests tip entry before eligible credit payment when tip collection is not delegated to the customer app. Off skips that POS-side setting-controlled prompt.

Where you’ll see it

Credit-payment tip prompt

Link to this setting ↗

Toggle

Tip Show

On enables the Tip control when the cart is eligible. Off disables it. Automatic tips and an empty cart can still disable manual tip entry.

Where you’ll see it

POS Tip button

Link to this setting ↗

Toggle

Ask For Tip In Customer App

On sends tip-selection interaction to the customer app. Off uses the POS-side workflow where configured. A functioning customer-screen integration is required.

Where you’ll see it

Customer tip screen

Link to this setting ↗

Toggle

Tip on Thank You Modal

On enables the post-credit-payment Thank You tip flow and polling in the print-selection stage. Off skips that feature.

Where you’ll see it

Customer Thank You tip flow

Link to this setting ↗

Toggle

Signature on Tip

Sends the signature-on-tip preference to the customer-app payload. The customer app must implement the signature screen.

Where you’ll see it

Customer app signature

Link to this setting ↗

Toggle

Auto-Apply Tip in Cart

On applies a positive automatic tip percentage during cart total calculation. Off stops that automatic rule. Manual tip controls are disabled while this rule is active.

Where you’ll see it

Cart tip calculation

Link to this setting ↗

Toggle

Tip Based on Guest Count

On sets a tip when guest count meets or exceeds the configured threshold. Off skips the guest-count rule.

Where you’ll see it

Dine-in tip calculation

Link to this setting ↗

Toggle

Guest Count Prompt on Dine In

On asks for guest count in the table-booking flow. Off skips that prompt; guest-count fee rules still need a supplied count.

Where you’ll see it

Dine-in guest-count prompt

Link to this setting ↗

Input

Auto Tip % by Guest Count

Enter the percentage applied when the tip guest-count rule matches, for example 18 for 18 percent.

Where you’ll see it

Guest-count tip rate

Link to this setting ↗

Input

Guest Count

Enter the minimum guest count that activates the automatic tip, for example 6.

Where you’ll see it

Guest-count tip threshold

Link to this setting ↗

Input

Tip Amount:

Despite the Amount label, this value is applied as a percentage by the automatic-tip path. Enter 10 for a 10 percent automatic tip.

Where you’ll see it

Automatic tip rate

Link to this setting ↗

Input

Cash Tip Button 1:

Sets cash tip preset 1. The cash preset values are also reused by the service-charge keypad.

Where you’ll see it

Tip and service-charge quick buttons

Link to this setting ↗

Input

Cash Tip Button 2:

Sets cash tip preset 2. The same preset is also used by the service-charge keypad.

Where you’ll see it

Tip and service-charge quick buttons

Link to this setting ↗

Input

Cash Tip Button 3:

Sets cash tip preset 3. The same preset is also used by the service-charge keypad.

Where you’ll see it

Tip and service-charge quick buttons

Link to this setting ↗

Input

Cash Tip Button 4:

Sets cash tip preset 4. The same preset is also used by the service-charge keypad.

Where you’ll see it

Tip and service-charge quick buttons

Link to this setting ↗

Input

Cash Tip Button 5:

Sets cash tip preset 5. The same preset is also used by the service-charge keypad.

Where you’ll see it

Tip and service-charge quick buttons

Link to this setting ↗

Input

Cash Tip Button 6:

Sets cash tip preset 6. The same preset is also used by the service-charge keypad.

Where you’ll see it

Tip and service-charge quick buttons

Link to this setting ↗

Input

Percentage Tip Button 1:

Sets percentage preset 1. Enter 10 for 10 percent. Percentage presets are also reused by the service-charge keypad.

Where you’ll see it

Tip and service-charge quick buttons

Link to this setting ↗

Input

Percentage Tip Button 2:

Sets percentage preset 2. Enter a percentage, not a currency amount.

Where you’ll see it

Tip and service-charge quick buttons

Link to this setting ↗

Input

Percentage Tip Button 3:

Sets percentage preset 3. Enter a percentage, not a currency amount.

Where you’ll see it

Tip and service-charge quick buttons

Link to this setting ↗

Input

Percentage Tip Button 4:

Sets percentage preset 4. Enter a percentage, not a currency amount.

Where you’ll see it

Tip and service-charge quick buttons

Link to this setting ↗

Toggle

Service Fee on Guest Count

On applies the guest-count service-fee rule. Off skips that rule. Item eligibility and other service-fee calculation controls still apply.

Where you’ll see it

Dine-in service-fee calculation

Link to this setting ↗

Input

Service Fee % on Guest Count Value

Enter the service-fee percentage used when the guest-count rule matches.

Where you’ll see it

Guest-count service-fee rate

Link to this setting ↗

Input

Guest Count for Service Fee

Enter the guest-count threshold for the service fee. In the current rule, zero or an empty threshold also satisfies the threshold condition; use an explicit positive value when needed.

Where you’ll see it

Guest-count service-fee threshold

Link to this setting ↗

Toggle

Service Fee

On enables the Service Fee control for a nonempty cart. Off disables manual access to that control. Existing or automatically applied fee data must be considered separately.

Where you’ll see it

POS Service Fee button

Link to this setting ↗

Dropdown

Service Fee Type

Cash means a fixed charge; Percentage means a percentage charge. The current item-level fee logic applies only to eligible items, with a fixed charge per eligible unit.

Where you’ll see it

Service-fee calculation

Link to this setting ↗

Toggle

Service Fee for Card

On includes the service fee in the eligible card calculation. Off excludes the setting-controlled card service fee while the cash calculation follows its own rules.

Where you’ll see it

Card service-fee amount

Link to this setting ↗

Merchant guide / 19

Cash and Scan Management

15 settings explained · Reference guide — change settings inside your POS.

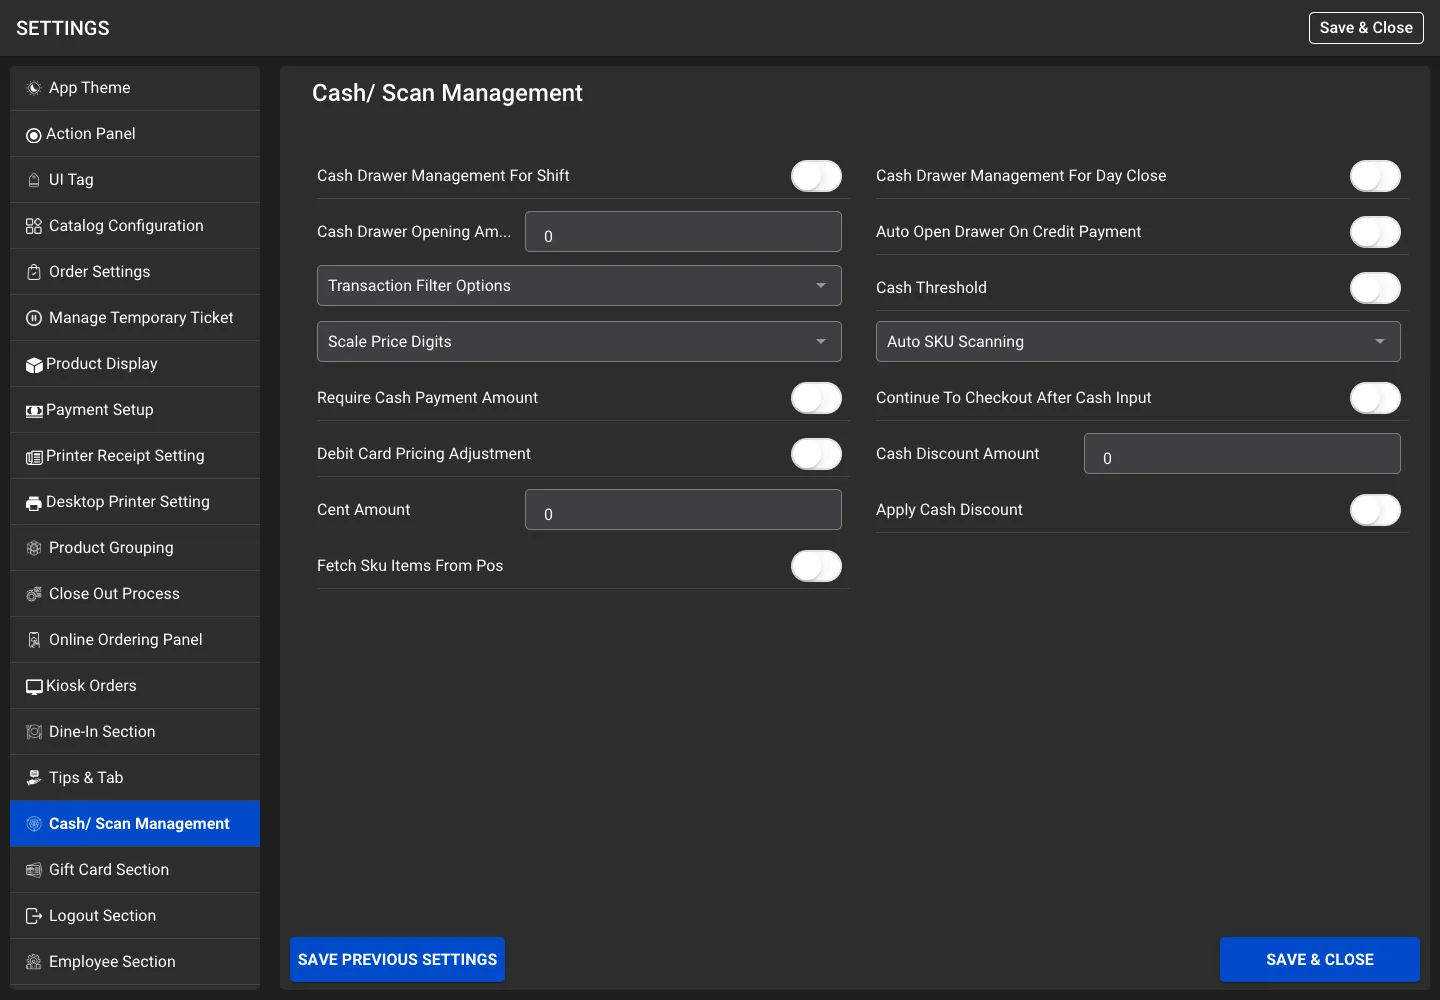
Separates cash counting, physical drawer opening, cash-entry validation, scanning and cash-discount configuration. A cash-drawer-management toggle is not a printer connection setting.

Screen 17 · Cash and Scan Management
Cash and Scan Management settings screen with demo values
Cash and Scan Management in the Settings screen with demo values. Additional controls may be below the visible scroll area.

See the affected screen or receipt example.

Toggle

Cash Drawer Management For Shift

On invokes cash-drawer counting or management during eligible shift flows. Off skips that management step. This is different from sending an electrical open-drawer pulse. Enabling it turns Day Close drawer management off.

Where you’ll see it

Shift cash reconciliation

Link to this setting ↗

Toggle

Cash Drawer Management For Day Close

On prompts for cash-drawer management during day close. Off skips that step. Enabling it turns Shift drawer management off.

Where you’ll see it

Day Close cash reconciliation

Link to this setting ↗

Input

Cash Drawer Opening Amount

Enter the opening cash float in currency units. The cash-drawer screen uses it to calculate net cash relative to the opening amount.

Where you’ll see it

Cash-drawer reconciliation

Link to this setting ↗

Toggle

Auto Open Drawer on Credit Payment

On allows opening the drawer for credit payments in supported completion and print paths. Off prevents that credit-only setting trigger; cash and some split paths may still open it.

Where you’ll see it

Payment cash-drawer behavior

Link to this setting ↗

Dropdown

Transaction Filter Options

Choose the default transaction search field: Check number, Amount, Order ID, Customer Name or Employee ID. It changes search interpretation, not transaction data.

Where you’ll see it

Transaction History search

Link to this setting ↗

Toggle

Cash Threshold

On enforces the calculated upper cash-entry limit in eligible cash checkout. Off uses a very large maximum. Required-cash and other validation still apply.

Where you’ll see it

Cash received validation

Link to this setting ↗

Dropdown

Scale Price Digits

Choose the embedded scale-barcode price digit format shown in the labels. The stored values 6 and 7 are slice positions, not the displayed digit count. Match the barcode format produced by the scale.

Where you’ll see it

Scale barcode decoding

Link to this setting ↗

Dropdown

Auto SKU Scanning

Active enables automatic SKU keyboard scanning on the active POS catalog. InActive disables that listener path. Scanning is paused when the POS is inactive or a modal, alert or popover is open.

Where you’ll see it

Catalog barcode and SKU scanning

Link to this setting ↗

Toggle

Require Cash Payment Amount

On requires a valid cash-received amount in eligible cash checkout. Off can default an empty value to the amount due. Refunds, payouts and cash-discount paths have additional rules.

Where you’ll see it

Cash payment validation

Link to this setting ↗

Toggle

Continue to Checkout after Cash Input

On continues checkout automatically after a sufficient cash amount is entered through the applicable denomination flow. Off leaves the final action to the cashier.

Where you’ll see it

Cash denomination checkout

Link to this setting ↗

Toggle

Debit Card Pricing Adjustment

Stores the debit pricing-adjustment preference. Matching adjustment code is commented out in this version; do not assume it changes debit totals.

Where you’ll see it

No confirmed active debit adjustment

Link to this setting ↗

Input

Cash Discount Amount

Despite Amount in the label, this value is used as a cash-discount percentage. Enter 3 for 3 percent. Apply Cash Discount and the pricing workflow determine when it is used.

Where you’ll see it

Cash discount calculation

Link to this setting ↗

Input

Cent Amount

Enter the fixed cash-discount component in cents. The calculation divides it by 100, so 50 means 0.50 in currency units.

Where you’ll see it

Cash discount fixed component

Link to this setting ↗

Toggle

Apply Cash Discount

On enables the cash-discount calculation paths using the configured percentage and cents. Off uses the normal price path. Check both cash and card totals after changing it.

Where you’ll see it

Item pricing and payment totals

Link to this setting ↗

Toggle

Fetch Sku Items From Pos

On uses the POS catalog SKU retrieval path. Off uses the alternative lookup path. Exact or Flexible SKU Lookup Mode is a separate control.

Where you’ll see it

SKU search source

Link to this setting ↗

Merchant guide / 20

Gift Card Section

4 settings explained · Reference guide — change settings inside your POS.

External Gift Card belongs to the Payment page. Physical and Virtual actions belong to the cart gift-card workflow. Those paths use different controls and should be tested separately.

Screen 18 · Gift Card Section
Gift Card Section settings screen with demo values
Gift Card Section in the Settings screen with demo values. Additional controls may be below the visible scroll area.

See the affected screen or receipt example.

Toggle

External Gift Card

On shows External Gift Card on the Payment page. Off hides that tender control. This differs from the cart Physical and Virtual gift-card selection.

Where you’ll see it

Payment gift-card tender

Link to this setting ↗

Toggle

Activate Virtual Gift Card

Stores the virtual gift-card preference, but the current gift-card action alert does not read this flag. Turning it off alone is not confirmed to hide Virtual.

Where you’ll see it

Stored gift-card setting with no confirmed alert effect

Link to this setting ↗

Toggle

Activate Physical Gift Card

Stores the physical gift-card preference, but the current gift-card action alert does not read this flag. Turning it off alone is not confirmed to hide Physical.

Where you’ll see it

Stored gift-card setting with no confirmed alert effect

Link to this setting ↗

Dropdown

Giftcard Option

Manual requests code entry; Scan starts scanning on supported mobile paths; Both offers the available choice. Browser keyboard scanning follows separate focus and listener rules.

Where you’ll see it

Physical gift-card identification

Link to this setting ↗

Merchant guide / 21

Logout Section

6 settings explained · Reference guide — change settings inside your POS.

Controls when the employee session ends or switches. The business login and saved station configuration are separate from employee logout.

Screen 19 · Logout Section
Logout Section settings screen with demo values
Logout Section in the Settings screen with demo values. Additional controls may be below the visible scroll area.

Toggle

Logout After Order Finalization

On logs out after eligible order finalization. Off keeps the staff session. Split-order and other workflow conditions can defer logout.

Where you’ll see it

After-payment session

Link to this setting ↗

Toggle

Logout After Send Order

On logs out after eligible Send or hold actions. Off retains the session. Send and Stay and source-specific hold behavior can affect this.

Where you’ll see it

After-send session

Link to this setting ↗

Toggle

Logout & Hold After Check Print

On combines check-print holding with logout in the applicable cart path. Off skips this setting-controlled behavior.

Where you’ll see it

Check-print hold and session

Link to this setting ↗

Toggle

Auto Logout on Inactivity

On starts inactivity monitoring on the POS page. Off disables that automatic timeout path.

Where you’ll see it

POS session timeout

Link to this setting ↗

Input

Inactivity Timeout Duration(seconds)

Enter inactivity duration in seconds. It is multiplied by 1000 for the timer. Use a positive value; visible when Auto Logout on Inactivity is enabled.

Where you’ll see it

POS inactivity timer

Link to this setting ↗

Toggle

Switch Account from Toolbar

On uses the account-switch action from the toolbar. Off uses the normal logout behavior.

Where you’ll see it

POS toolbar account action

Link to this setting ↗

Merchant guide / 22

Employee Section

3 settings explained · Reference guide — change settings inside your POS.

Controls employee selection and attribution. Staff permissions are configured separately and still restrict actions.

Screen 20 · Employee Section
Employee Section settings screen with demo values
Employee Section in the Settings screen with demo values. Additional controls may be below the visible scroll area.

Toggle

Employee For Services

On requests staff selection for service-category items and exposes associated staff details. Off uses the ordinary service-item flow.

Where you’ll see it

Service item staff assignment

Link to this setting ↗

Toggle

Switch Employee

Stores the Switch Employee preference. The matching cart condition is commented out; no active setting-driven switch behavior was confirmed. The separate switchStaff method logs out.

Where you’ll see it

Stored employee setting

Link to this setting ↗

Toggle

Employee For Orders

On attaches or uses staff attribution in the relevant order and split-order paths. Off uses their normal staff attribution behavior.

Where you’ll see it

Order staff attribution

Link to this setting ↗

Merchant guide / 23

About

1 settings explained · Reference guide — change settings inside your POS.

Displays application and desktop version information. Desktop updating requires an available newer version and a functioning desktop update bridge.

Screen 21 · About
About settings screen with demo values
About in the Settings screen with demo values. Additional controls may be below the visible scroll area.

App Version, Build Version and Release Date are read-only values. In desktop mode, Desktop Version is the installed EXE version, Available Desktop Version comes from update metadata, and Desktop Update shows update status or an error. The available version is compared with the installed desktop version, not the browser POS display version.

Action

Update Desktop App

Shown when the desktop app reports an available newer version. Clicking requests the update flow; it is disabled during updates or without an update action. Save settings first. Desktop updates install only after the customer chooses Update.

Where you’ll see it

Desktop application update

Link to this setting ↗

Merchant guide / 24

Screens showing the effects

Step-by-step merchant reference

These examples show where settings take effect. Demo values are for orientation and are not a recommended business configuration. In the HTML guide, click an image to enlarge it.

POS actions and catalog

Action Panel, UI Tag, Catalog Configuration and Product Display affect this register screen. Clock In, transaction history, online orders, Send, Pay and Tax Exempt are controlled separately. The blank demo cart is intentional; no sale was created.

Screen 22 · POS actions and catalog
POS actions and catalog with demo data

Light catalog appearance

Dark Mode off selects the light catalog variant. It does not recolour every application panel. Action button colours and labels are configured separately.

Screen 23 · Light catalog appearance
Light catalog appearance with demo data

Kiosk notification popup

Enable Kiosk Orders plus Show Popup on New Kiosk Order allows this popup when the reported count increases. Ringing is independent. The first count is a baseline. Notification-list kiosk entries open Transaction History.

Screen 24 · Kiosk notification popup
Kiosk notification popup with demo data

Online check receipt example

Left: top business details, email, extras headings and split suggestions enabled. Right: business details moved to the bottom, customer and extras hidden, and split suggestions disabled. The data is the same. These are Template 3 renderer previews.

Screen 25 · Online check receipt example
Online check receipt example with demo data

POS check receipt example

Template 1 with suggested tips enabled versus disabled. The receipt type, finalization state and supplied payment-terminal text also influence the printed sections. These are renderer previews.

Screen 26 · POS check receipt example
POS check receipt example with demo data

Shift report detail example

Left: business email and cash/card order details enabled. Right: email hidden and shift-close card details hidden. The Hide Credit Card Details switch overrides the enabled desktop card-detail switch. These are renderer previews.

Screen 27 · Shift report detail example
Shift report detail example with demo data

Merchant guide / 25

Important setting combinations

Step-by-step merchant reference

GoalRequired combinationImportant limit
Only online automatic printingEnable Online Orders on; Auto Print Online Orders on; choose Online Order Print Type; kiosk master off.Processing also depends on online status and polling guards.
Only kiosk kitchen printingEnable Kiosk Orders on; Print Kiosk Orders in Kitchen on; online master off.Only ACCEPTED kiosk orders are selected. Online auto-print off does not disable kiosk printing.
Both sourcesEnable both masters and their separate print switches.New-order print calls share a per-station queue. Other stations and a server that acknowledges before spooling still need server-side coordination.
Kiosk sound without popupKiosk master and ringing on; popup off.Only a count increase triggers sound. A replacement order with unchanged total count cannot be detected from the count alone.
Card detail on close reportDesktop Card Order Details on; corresponding day or shift Hide Credit Card Details off.The report must include card-order rows.
Business details at bottom onlyCheck Business Name at Bottom on.Top is switched off. These settings affect desktop checks, not every report.
Hold on check with confirmationSave Order on Check Print After Confirmation on.The immediate hold setting is switched off. Logout and other hold rules may also apply.
Cash count by shiftCash Drawer Management For Shift on.Day Close management is switched off by this change, and vice versa.
Automatic tipAuto Apply Tip on; positive Tip Amount value.That value is treated as a percentage. Guest-count rules are separate and should be tested together.
Reliable SKU scanAuto SKU Scanning Active; appropriate lookup mode and source; active POS catalog.Modal, alert and popover visibility pauses the catalog listener. Gift-card entry is a different workflow.

Merchant guide / 26

Inactive and hidden controls

Step-by-step merchant reference

The following differences matter when training staff. A stored preference is not proof that an active workflow reads it.

  • Payment Method Fee fields: saved, but no active consumer was found outside settings and initialization for surchargePercentage or surchargeCents.
  • Debit Card Pricing Adjustment and cash service-charge discount for dine-in: matching adjustment code is commented out. Do not promise a price change from these switches.
  • Today’s Specials and Happy Hour Items: the corresponding catalog shortcuts are commented out in the current template.
  • Activate Virtual and Physical Gift Card: saved flags are not read by the current gift-card choice alert. Turning them off alone is not confirmed to hide those actions.
  • Switch Employee: the relevant cart condition is commented out; the separate method with a similar name logs out.
  • Tax Exempt Text Color: settings and cart use differently spelled property names, so this colour change may not appear.
  • SSL Mode beside Scale Device IP: saves a cart-port preference that the active getCartPort helper does not read. Customer cart routing uses 6967 or 6968 based on the printing SSL port instead.
  • Hidden desktop controls: TCP Port, Printing TCP Port, Drawer Pin and Receipt Footer Text are commented out. Their stored values still exist. The footer defaults to Powered by Nova Flare Connect; the visible Invoice Footer is a separate setting.
  • Server Base URL and import/export buttons: commented out in this Settings template. They are not visible customer configuration fields.
  • Print all font sizes: the support method remains, but there is no visible settings button for it.

These are observations of this project version, not recommendations to change the source while performing setup.

Merchant guide / 27

Setup acceptance checks

Step-by-step merchant reference

Merchant guide / 28

Source reference

Step-by-step merchant reference

This reference maps the guide to the current project. Setting descriptions use active consumers where available; externally implemented printer and customer-app behavior is identified as dependent on that service.

AreaProject fileWhat it establishes
Visible settingssrc/pages/desktop-printers/desktop-printers.htmlLabels, controls, dropdown options, conditions and commented-out fields.
Save and restoresrc/pages/desktop-printers/desktop-printers.tsupdatePrinterSettings, posSettingJson, setSettingData, desktop validation and mutually exclusive toggles.
Defaults and initializationsrc/app/globalPos.ts; src/app/app.component.tsGlobal values, runtime platform, startup restoration and update metadata.
Cart and catalogsrc/components/category; src/components/view-cart; src/components/cart-buttonsVisibility, SKU scanning, totals, labels, gift-card actions and print or hold behavior.
Paymentsrc/pages/payment; src/pages/payment-express; src/pages/select-print-typeTender visibility, cash input, tip prompts and payment completion.
Online and kiosksrc/pages/home/home.ts; src/pages/pos/pos.ts; src/pages/pos/pos.htmlPolling, kiosk accepted-order filter, count-based notifications and popup UI.
Print routingsrc/providers/server/serverPos.ts; src/providers/server/server.tsLocal API payloads, desktop bridge routing and new-order queue.
Desktop renderingdesktop/check-receipt.js; desktop/check-template-1.js; desktop/day-close-template.js; desktop/day-close.js; desktop/no-sale.js; desktop/cash-drawer.jsReceipt sections, report detail overrides, printer transports and COM drawer validation.
Other affected screenssrc/pages/hold-orders; src/pages/order-listing; src/pages/tables-booking; src/pages/day-close; src/providers/idleHeld-order filters, search options, table access, close reports and inactivity timer.

Prepared for the project in /Users/apple/Projects/NFC/pos-nfc. Review date 10 November 2026. No live sale, payment, print job, drawer command or settings-save request was performed to create this guide.